

Organic broccoli sprouts are great on salads and in sandwiches, and they are very easy to grow in your kitchen. Here’s how to grow broccoli sprouts at home for year-round fresh greens.
Trying to figure out how to add more homegrown greens to your diet, even when a garden isn’t possible? Consider growing sweet potato greens!
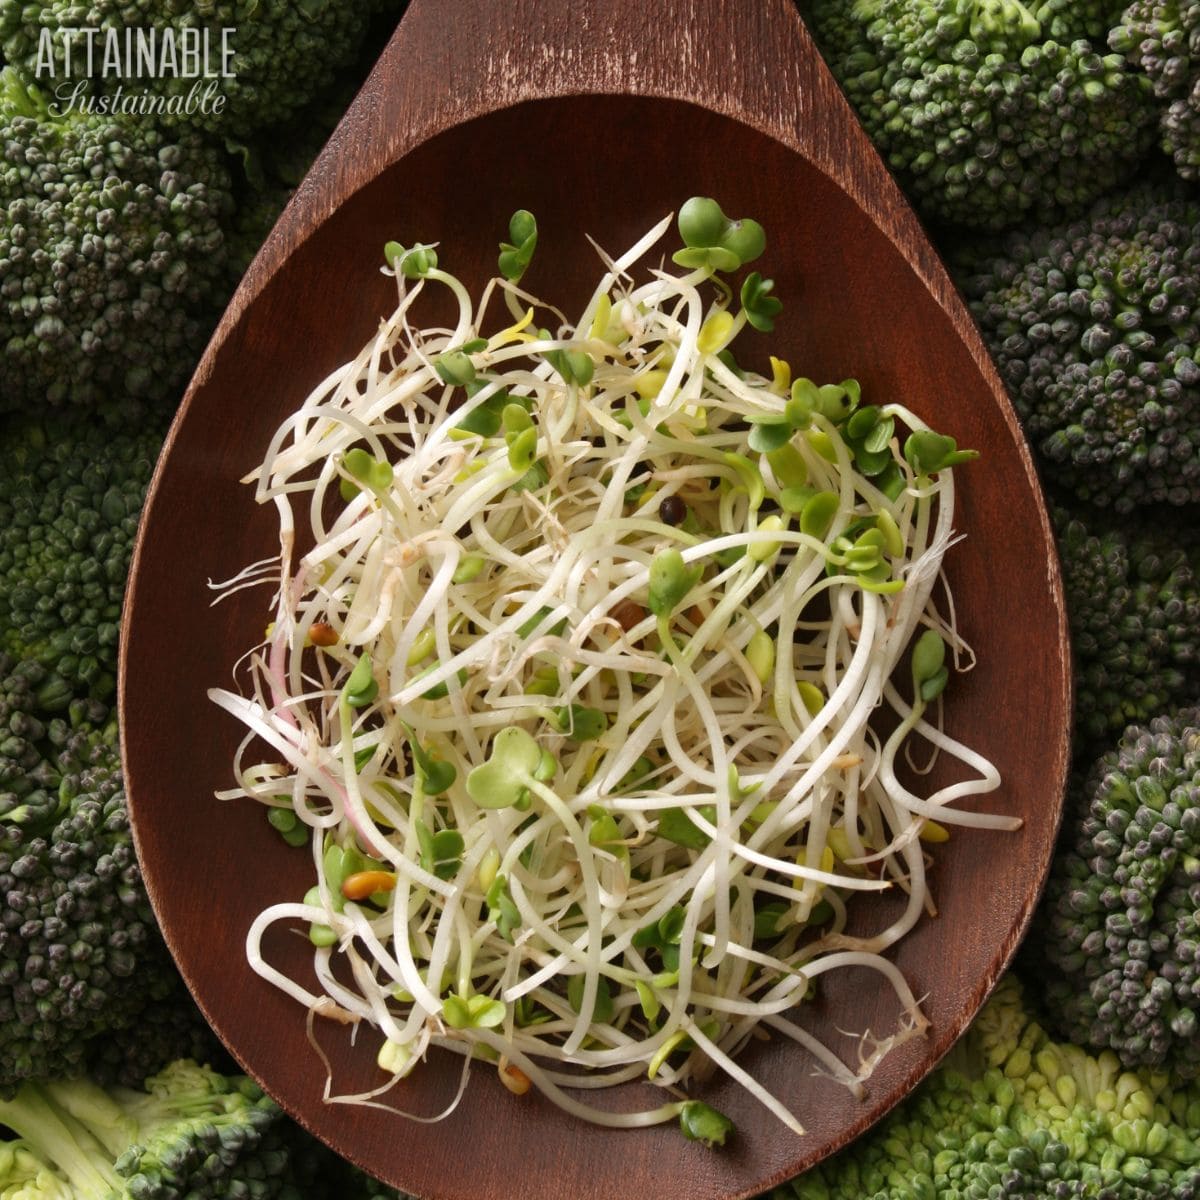
While sprouts are often readily available at the grocery store, growing your own is a great way to keep fresh greens on hand all year long with very little effort.
Sprouting is a simple way to grow food in your own kitchen without even a small pot of dirt. Sprouts are generally considered one of the foods highest in enzymes and are chock full of many vitamins and minerals, depending on the seed you are sprouting.
Organic broccoli sprouts, in particular, have come into focus as a particularly nutritious seed to sprout.
Cruciferous vegetables are generally considered a category of vegetables good for detoxification but the sprouts of broccoli are said to contain even higher quantities of the sulfur compounds that detoxify your body than mature broccoli.
Grow Some Greens!
Ready to grow fresh greens, no matter WHERE you live? Sign up for my
FREE quick-start guide and start growing some of your own food!

Sprouting Primer
If you’ve planted a garden, you’ve grown sprouts. The process requires quite the same parameters of moisture and warmth to create delicious, homegrown sprouts. Instead of planting directly in soil, though, you simply use water.
With this jar method, the germination process happens inside the jar, creating sprouts that are essentially tiny baby broccoli plants.
The first few days of sprouting these organic broccoli seeds can be done with or without daylight. But after a few days you will see little tails and then tiny little leaves beginning to emerge. That is when you want to get your sprouts into indirect sunlight to green them up and allow them a bit of time to make chlorophyll.
To determine how much broccoli seed to start with, you must decide how large you wish to grow these broccoli sprouts.
Consuming them early in their growth, some health experts say, is better. In that case, three tablespoons of broccoli seeds will work well. If you want them to grow long and leafy, use two tablespoons and give them a couple of extra days of growth.

 The 5-Gallon Garden
New to gardening? Limited on space? The 5-Gallon Garden gives you the skills you need to grow food in the space you have. Get started with your garden today!
Preparing to Grow Broccoli Sprouts
Ready to grow your own broccoli sprouts? Letting the seeds for these cruciferous veggies begin their sprouting process in a jar allows you to enjoy fresh greens even in the darkest winter months.
You don’t need any fancy equipment or a specialized sprouting kit in order to have success with sprouting at home.
You’ll need a quart sized mason jar, a canning ring, and a sprouting screen in order to grow sprouts at home. You’ll also need sprouting seeds and fresh cool water. I prefer to use organic sprouting seeds.
You can make your own sprouting screen at home by cutting a piece of window screen to fit a wide mouth mason jar. Draw a circle on the screen using the mouth of the jar as your pattern. Cut around the circle and place it on the jar rim, using a canning ring to hold the mesh in place.
In a pinch, you could use a sheer fabric (upcycled sheer curtains work), secured in place with a rubber band. Avoid using cheesecloth, as the little seeds will get caught in the cloth.
There are also plenty of mesh lid options available commercially.
Soaking the Seeds
Place the seeds into the bottom of the quart jar. Cover with water up to the two-cup measure, place the sprouting screen and canning ring on the jar, and leave to soak at room temperature (60-80 degrees Fahrenheit) for 8-12 hours.
Rinsing the Seeds
Once you’ve soaked the seeds, simply turn the jar upside down over your sink and allow the water to drain out. Rinse the seeds 2-3 times with cold water and then drain this water out as well.
The moisture from the soaking and rinsing will be enough to get the sprouting process started.
Leave the jar tilted downward in a bowl at a 45 degree angle to drain any excess water off. After 12 hours, repeat the rinsing process as stated above with clean water and place the jar back into the bowl to drain and rest for another 12 hours.

Repeat the 12 hour cycle of rinsing in fresh water, draining, and resting the organic broccoli sprouts two times a day, until you begin to see sprouts forming. This usually takes three days, depending on the temperature of your kitchen.
If your kitchen is 85 degrees or above, you may want to rinse the sprouts once at mid-day as well to avoid any fermentation.

Once sprouts begin to form, move the sprout jar into indirect sunlight and continue the rinsing/draining/resting cycle until the broccoli sprouts have reached the desired size.
Consume the broccoli sprouts immediately after the final rinse or refrigerate for several days before consuming.
Storing the Sprouts
You can use a salad spinner to force excess water from the raw broccoli sprouts before storing them, but this is optional.
Place fully drained sprouts in an airtight container in the fridge. Lining the bottom of the container with an absorbent piece of cloth or a paper towel can absorb excess moisture. Too much water in the container can allow for unwanted bacterial growth.
Eating these Fresh Sprouts
The entire sprout, including the little cracked seed hulls, are edible. There are so many different ways to enjoy homegrown sprouts!
- Add them to green salad.
- Top a sandwich.
- Put them in wraps.
- Add them to smoothies.
- Mix into tuna or chicken salad.
- Put some on your avocado toast.

More Healthy Sprouts and Microgreens to Grow
- How to grow popcorn microgreens
- Growing bean sprouts
- How to grow sunflower microgreens
- Grow lentil sprouts

How to Grow Broccoli Sprouts
Broccoli sprouts are easy to grow at home, delicious, and a great way to generate some fresh greens during winter months or on an urban countertop.
Materials
- 1 quart glass jar
- A sprouting screen (or make one; see notes)
- 1 canning ring
- 2-3 tablespoons of organic broccoli sprouting seeds
- water
Tools
- Scissors (for cutting screen)
Instructions
- Place your sprouting seeds into the bottom of the quart jar. Cover with water up to the two-cup measure, place the sprouting screen and canning ring on the jar, and leave to soak at 60-80 degrees for 8-12 hours.
- After the soaking period, tip the jar and allow the water to drain out. Then add more water to cover the seeds by one-half inch and swirl around to rinse the seeds. Drain this water out as well.
- You will now be leaving your sprouts to drain in a bowl. (The moisture from the soaking and rinsing will be enough to get the process started.)
- Leave the jar tilted downward in a bowl at a 45 degree angle to drain any remaining water off.
- After 12 hours, repeat the rinsing process as stated above and place the jar back into the bowl to drain and rest for another 12 hours.
- Repeat the 12 hour cycle of rinsing, draining, and resting, until you begin to see sprouts forming. This usually takes three days, depending on the temperature of your kitchen. (If your kitchen is 85 degrees or above, you may want to rinse once at mid-day as well to avoid any fermentation.)
- Once sprouts begin to form, move the sprout jar into indirect sunlight and continue the rinsing/draining/resting cycle until the broccoli sprouts have reached the desired size.
Notes
Consume the organic broccoli sprouts immediately or refrigerate for several days before consuming.
Make a sprouting screen
Cut a piece of window screen to fit a wide mouth mason jar. Draw a circle on the screen using the mouth of the jar as your pattern. Cut around the circle and place it on the jar rim, using a canning ring to hold the mesh in place.


Do you need to remove the seed covers?
Do you mean the screen? If so, then yes when you’re ready to eat them.
We’re a bunch of volunteers and starting a brand new scheme in our community.
Your web site offered us with useful information to work on. You have performed an impressive
job and our whole community will likely be thankful
to you.
do you need to dry the sprouts when finished before refrigerating? if so, how do you dry them?
I like to store stuff like this in a container lined with a flour sack towel. It absorbs excess liquid but maintains a certain level of moisture.