When you search the canned food aisle at the grocery store, you’ll find peaches and pears and pineapple. Canned plums, though? Those are a specialty item. Happily, it’s easy to transform fresh plums into a shelf stable product that you can enjoy all year long.
Canning Plums
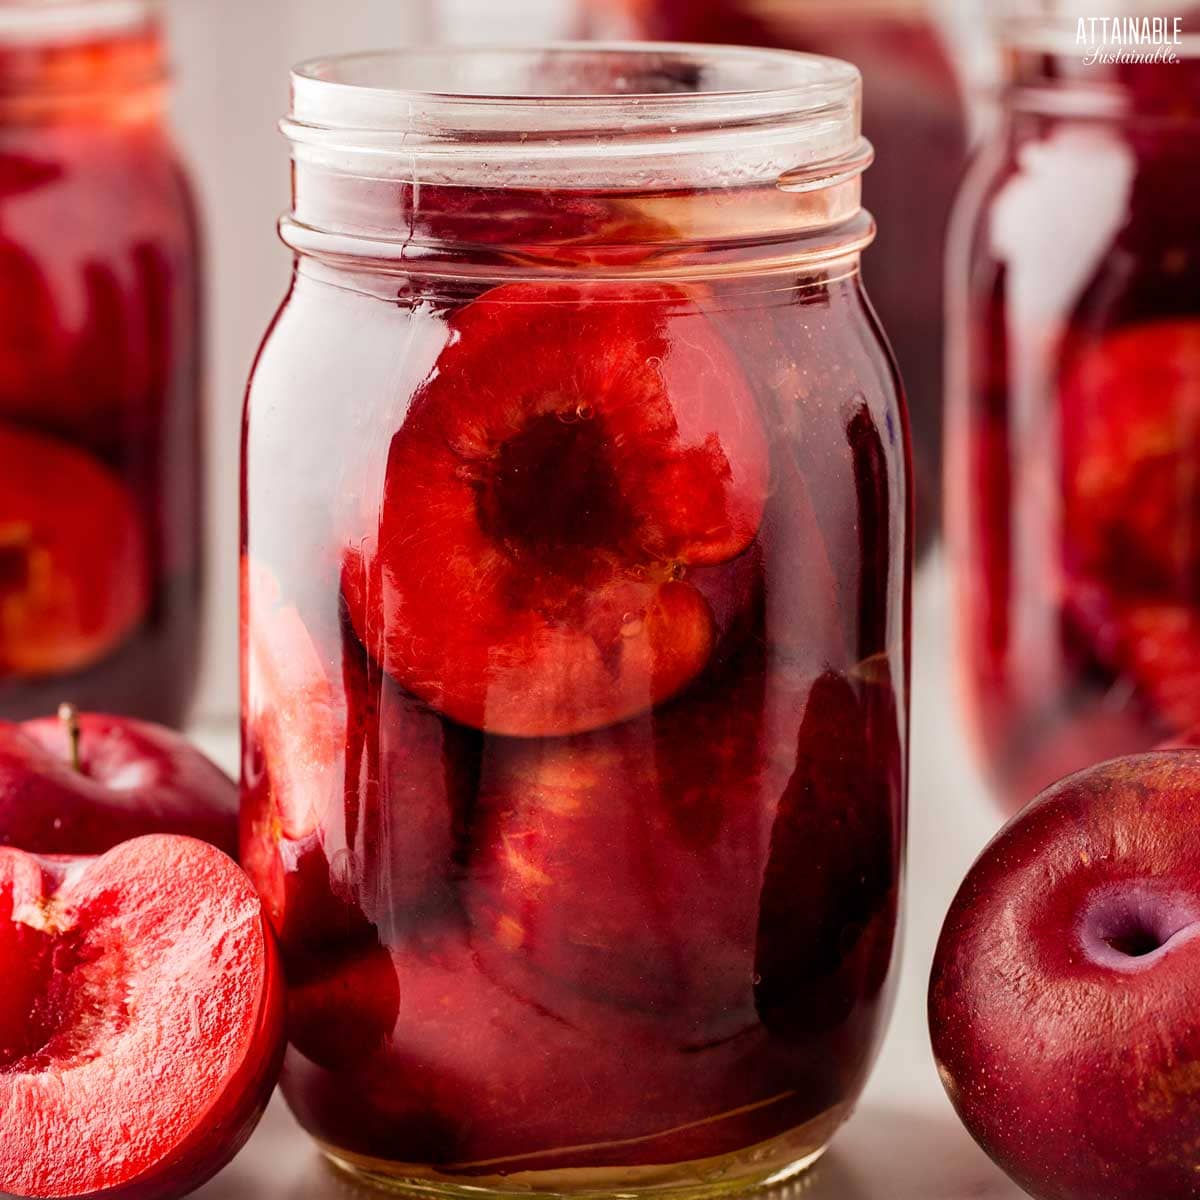
Preserving plums for the pantry is an easy canning recipe, one good for beginners. Why? Because they can be processed in a water bath. Plums do not need to be pressure canned, but they can be.
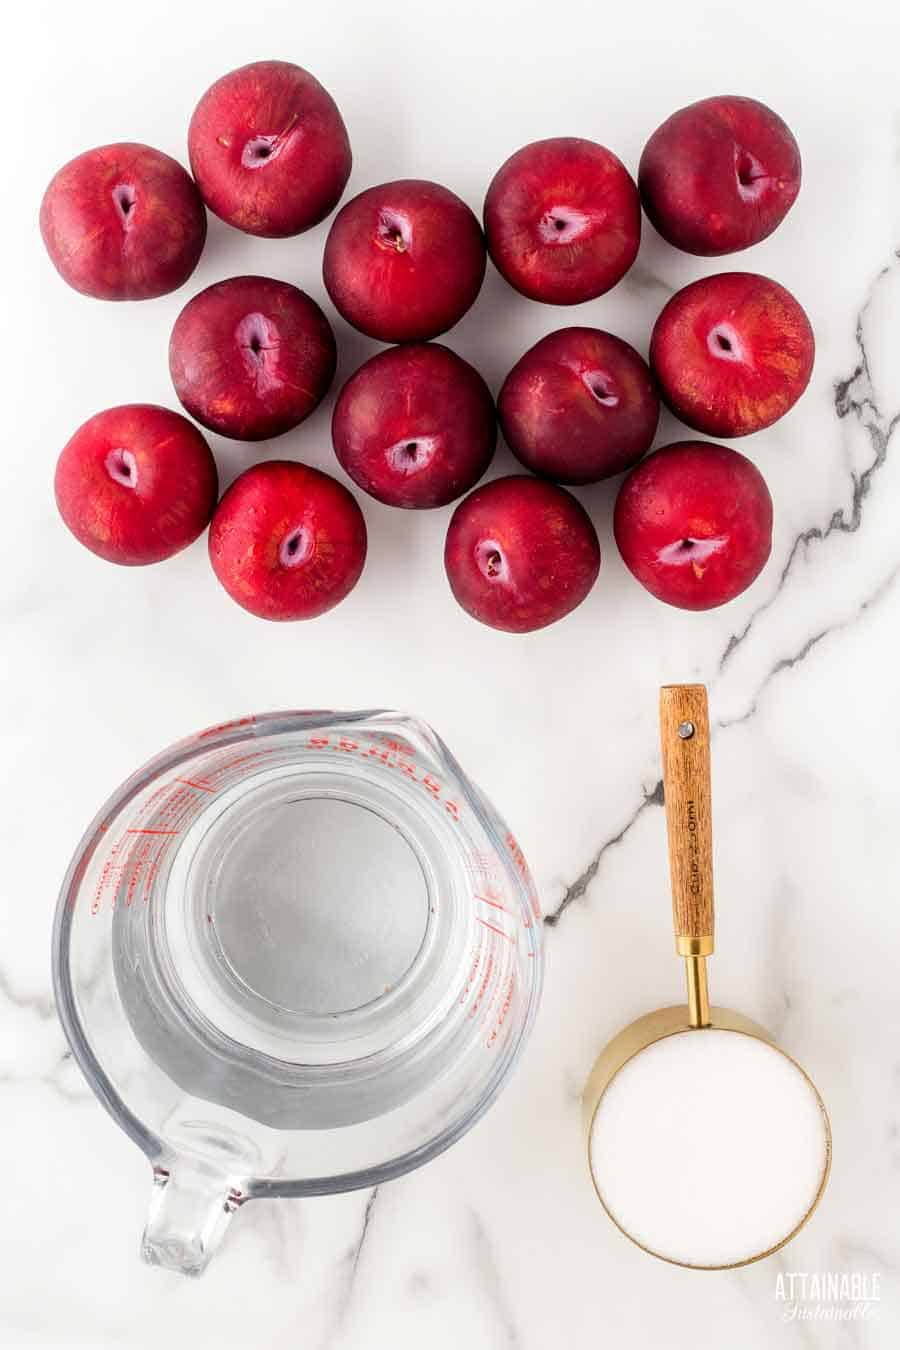
Ingredients
Plums — Like other stone fruit, plums can be freestone or cling. Freestone fruit come away from the pit easily; cling fruits do not. (Most Italian plums are freestone.) If you wish to can plum halves, you will find it so much easier with freestone fruit. Plums can be canned whole; it may be easier to use this method if your plums don’t easily separate from the pit.
Sugar — Adding sugar to a recipe for canned fruits can help the fruit retain its color and shape. You can safely alter the amount of sugar in this recipe, though. See below for more.
Getting Started
The process for making home canned plums isn’t difficult, but you will need to have some special canning equipment and a basic understanding of the canning process. I cover the equipment in depth here, but here’s a quick overview of what you’ll need:
Get a Quick Start Guide to Safe Canning!
Want to learn how to preserve the harvest? Dive in for a look at various canning techniques and methods! Grab my FREE 6-part guide to getting started.
- Canner or large stock pot with a rack
- Jar lifter
- Canning jars (quarts or pints, wide mouth)
- Lids and rings
- Canning funnel
- Non-metal knife or chopstick for removing bubbles
- Clean cloth for wiping jar rims
- Kitchen towel to line counter for processed jars
How to Can Plums with Less Sugar
Canning plums at home allows you to adjust the sweetness of the end product. The sweetness of the syrup you choose will dictate how sweet the plums are when you open the jar.
If you’re really restricting your sugar intake, you can even skip the sugar entirely.
Make the Sugar Syrup
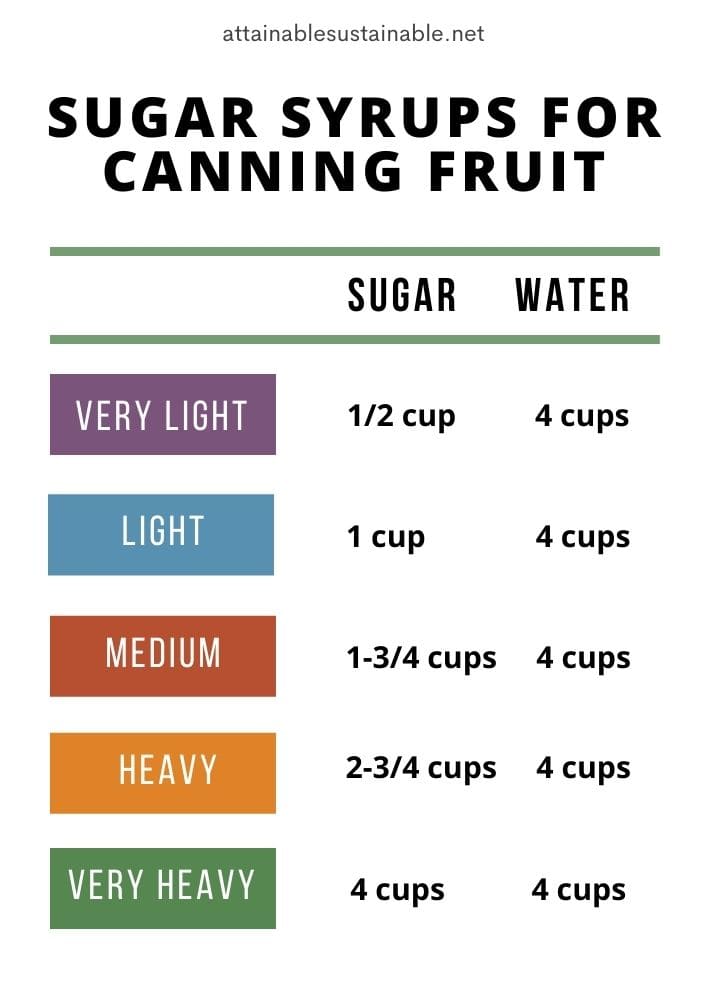
The liquid used in this recipe is a simple combination of sugar and water, heated to dissolve the sugar and make a sugar syrup. The syrup for canning fruit can be very light or very heavy or somewhere in between. Click here to download a printable copy of the sugar syrup cheat sheet above, so you’ll know what measurements to use for a variety of sweetness.
- Canning plums in light syrup: I tend to try to use as little sweetener as possible, so I almost always use a very light syrup. This allows the flavor of the plums to shine through.
- Canning plums in heavy syrup: A heavier syrup is often used when you’re dealing with less ripe fruit that can benefit from a flavor boost.
- Canning plums with no sugar: Using a sugar syrup in canning can help the fruit retain its shape, color, and flavor, but if you’re really restricting sugar, canning plums in water is perfectly safe.
- Canning plums in honey: You can substitute honey for the sugar in this recipe. Honey tends to be sweeter than sugar, so use 2/3 cup of honey for every cup of sugar.
Combine the sugar and water in a saucepan and heat until the sugar is dissolved; stir occasionally. Keep the syrup hot until you’re ready to use it.

Prepping the Plums
Plums can be canned as halves or whole. It is unnecessary to peel plums for canning, according the National Center for Home Food Preservation.
Wash raw plums. You’ll then need to decide if you want to can plums whole or halved. To halve plums, cut each in half from the stem end to the base and back up. Twist plums and remove the pit.
To can whole plums, use a fork to prick the skin of the fruit in a couple of places to prevent the fruit from bursting.
 Ready to DIY your pantry with more wholesome ingredients? Check out my new book from National Geographic! Attainable Sustainable Pantry is filled with delicious recipes for some of your favorite condiments, snacks, and toppings, along with an entire section on safe home food preservation. It’s the guide you need to start skipping packaged products and embrace homemade.
Prepare the Canning Pot
Fill a large canner with water. Just how much water to use depends on the size of jar you’ll be processing. You’ll want the water level to sit at least an inch above the full jars during processing.
Wash the canning jars and check the rims for nicks that could interfere with sealing. You can safely use either pint jars or quart jars for this recipe. Wide mouth jars are recommended here, simply because it’s easier to pack the plums.
Place clean jars inside the canner as it’s heating. Using jars that are warm helps to prevent breakage due to thermal shock.
Hot tip: Boil some extra water in a saucepan or electric kettle as you’re working. If you need to top off the water in the canner, you won’t cool down the water too much.
Prepare the Jars
When you’re ready to start filling the jars, lift the empty jars from the canner and set on a towel-lined countertop.
Raw Packing
With the plums peeled and sliced, pack the plums firmly into the jar, filling gaps as good as you can without smashing the fruit.
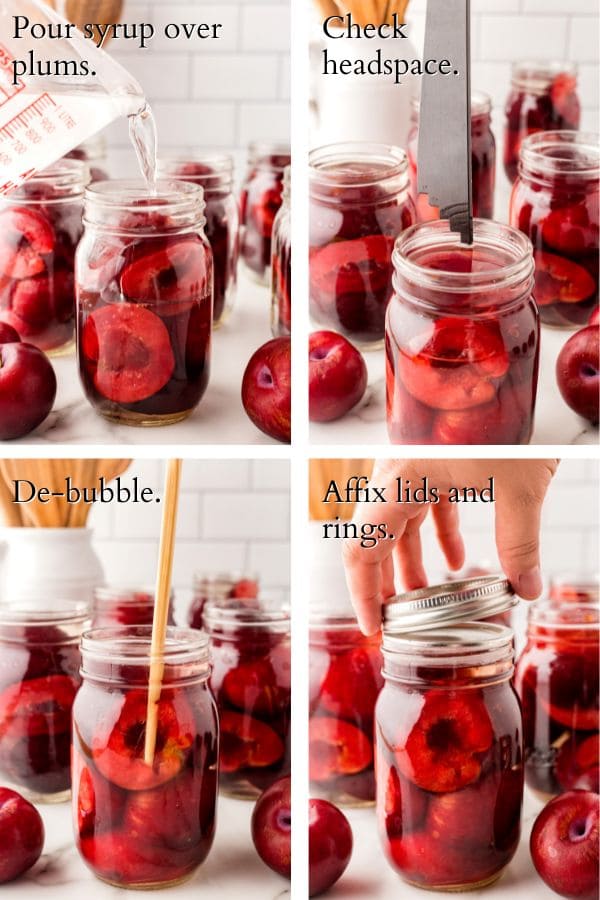
Once packed, pour the hot canning liquid over the fruit.
Hot Packing
Transfer whole of halved plums to the hot syrup and boil for two minutes. Remove from heat and let the plums stand in the hot mixture for 20-30 minutes.
Use a slotted spoon to transfer plums to the jars. Pour hot syrup over the plums.
Slide a non-metal tool down inside the jar edge to release any bubbles. Double check the level of liquid and top each jar off, filling to a 1/2″ headspace.
Use a damp cloth to wipe the rim of each jar; a little bit of food on the jar rim can prevent the lids from sealing properly.
Set the lids in place and screw the bands on firmly tight (but not too tight). Use a jar lifter to transfer jars into the gently boiling water. As stated above, the water in the pot should cover the jars by at least an inch. If necessary add more water to the canner.

Processing
Process jars for the recommended time in a water bath canner. (See below.) When time is up, use the jar lifter to transfer the jars to a flat surface that’s padded with a kitchen towel. Allow jars to cool completely. As they cool, you’ll begin to hear a canner’s favorite sound: That lovely little tink! that indicates a successful seal.
Once jars are thoroughly cooled, check the seal on all of the jars. The lid should be concave and feel solid. If it flexes at all, it’s not sealed. (Place any jars that didn’t seal in the refrigerator and use them first. They are not shelf stable.)
Remove bands from cooled jars and rinse the jars. Store jars without the bands.
Do you have questions about home canning? First time canner? Check out this list of 101 frequently asked canning questions!
🍅 Safety First!
Canning is an excellent way to preserve food for the pantry, but there are some important safety considerations to keep in mind. The recipes on this site have been made following safe canning procedures by a certified Master Food Preserver.
- Know the difference between water bath canning and pressure canning. Low acid items must be pressure canned for safety.
- Altering ingredients may change the recipe’s pH, posing a safety issue.
- Use the proper jars and lids. Never reuse lids, with the exception of the Tattler or Harvest Right hard plastic lids that are intended for such a purpose.
- For more on canning equipment, please go here.
- Want to learn more? The National Center for Home Food Preservation is the go-to resource for safe canning information.
Why are my Plums Floating?
This is an issue more common with raw packed fruits than those that are hot packed. The air inside the uncooked fruit takes up space in the jar; when the fruit is processed and cooked, it shrinks, creating more space in the jar.
There are a couple of things that can contribute to floating fruit:
- Loosely packed fruit allows more room for fruit to float. To eliminate this problem, get those plums packed in the jar as snugly as you can without smashing them.
- Air bubbles. You’ll want to make sure you release any trapped air in the jars using a non-metallic knife or chopsticks.
Floating plums may darken and slightly discolored, especially if exposed to air, but the fruit is perfectly safe to eat.
★ Did you love this recipe? Be sure to give it a star rating below! ★
Canning Plums
Equipment
- 9 pint jars adjust quantity for quarter-pint and pint jars
- 9 canning lids and rings
- canning funnel
- water bath canner with lid or deep pot
- jar tongs
- canning bubble popper/measurer optional but handy
Ingredients
- 9 pounds fresh plums
- 1 cup sugar
- 6 ½ cups water
Instructions
Recipe yields 9 pint jars.
PREPARE FOR CANNING
- Wash the jars you'll use, making sure each is clean and free of nicks in the rim, which could impede sealing.
- Wash the lids and rings in hot soapy water. (If you're using non-Ball brand lids, prepare as suggested by manufacturer.)
- Place empty jars in a canning pot or large stock pot with enough water to cover by an inch or two, cover pot, and set on high heat. It can take awhile for the water to heat, so get it started before you begin making the recipe.
PREPPING THE SYRUP AND PLUMS
- Combine sugar and water in a large pot; bring to a boil.1 cup sugar, 6 ½ cups water
- Meanwhile, prepare plums. For halves, remove stems and cut each plum in half; discard pit. To can whole plums, use a fork to puncture the skin on opposite sides of the fruit.9 pounds fresh plums
- Remove jars from the canner, draining the water back into the pot. Raw pack: Pack raw plums into jars snugly. Cover with hot syrup to a 1/2" headspace. Hot pack: Place whole or halved plums into the hot syrup and boil for 2 minutes. Turn off the heat, cover the pot, and let stand for 20-30 minutes. Use a slotted spoon to transfer plums into jars. Pour hot syrup over plums, leaving a ½ inch headspace.
- Run a non-metallic knife or chopstick around the inside of the jar to release air bubbles. Add more syrup to maintain the ½ inch headspace if necessary.
- Wipe jar rims to remove any residue that may have spilled. A clean rim is essential to a good seal.
- Set jar lids in place. Screw bands on finger tight.
CANNING
- Use a jar lifter to gently submerge jars into hot water in the canning pot. Water should cover the top of the jars by one-to-two inches. The water will cool somewhat in reaction to the addition of the jars. Return the water to a simmer and then set the timer.
- Process pints for 20 minutes, quarts for 25 minutes at 0-1,000' feet altitude; 25/30 minutes (pints/quarts) for elevations between 1,001-3,000'; 30/35 minutes (pints/quarts) for elevations between 3,001-6,000'; or 35/40 minutes (pints/quarts) over 6,000'.
- Remove jars from water using the jar lifter and transfer to a solid, towel-covered surface. Allow to cool for 24 hours.
- Check seals. Lids should be solid and pulled down tight. (if they flex and pop, the jar didn’t seal; put unsealed jars in the refrigerator and use those first).
- Remove rings and wash outsides of jars. Store in a cool, dry place.
Notes
- Recipe yields 9 pint jars.
- Very light syrup: 1 cup sugar to 6.5 cups water
- Light syrup: 1.5 cups sugar to 6.5 cups water
- Medium syrup: 2.5 cups sugar to 6.5 cups water
- Heavy syrup: 4.25 cups sugar to 6.5 cups water


Please email me your canning plums in a hot water bath with recipe. Can you substitute the sugar for sugar free sugar? Like Splenda or Sweet and Low? If not would the honey be better?
Thank you for answering my questions. I need the receipe soon because my plums are just about ready.
Susan Hitz
The recipe is right here on the page, near the bottom. You cannot safely use sugar alternatives. I don’t know if honey would be “better” (for what?) but that is an acceptable substitute.