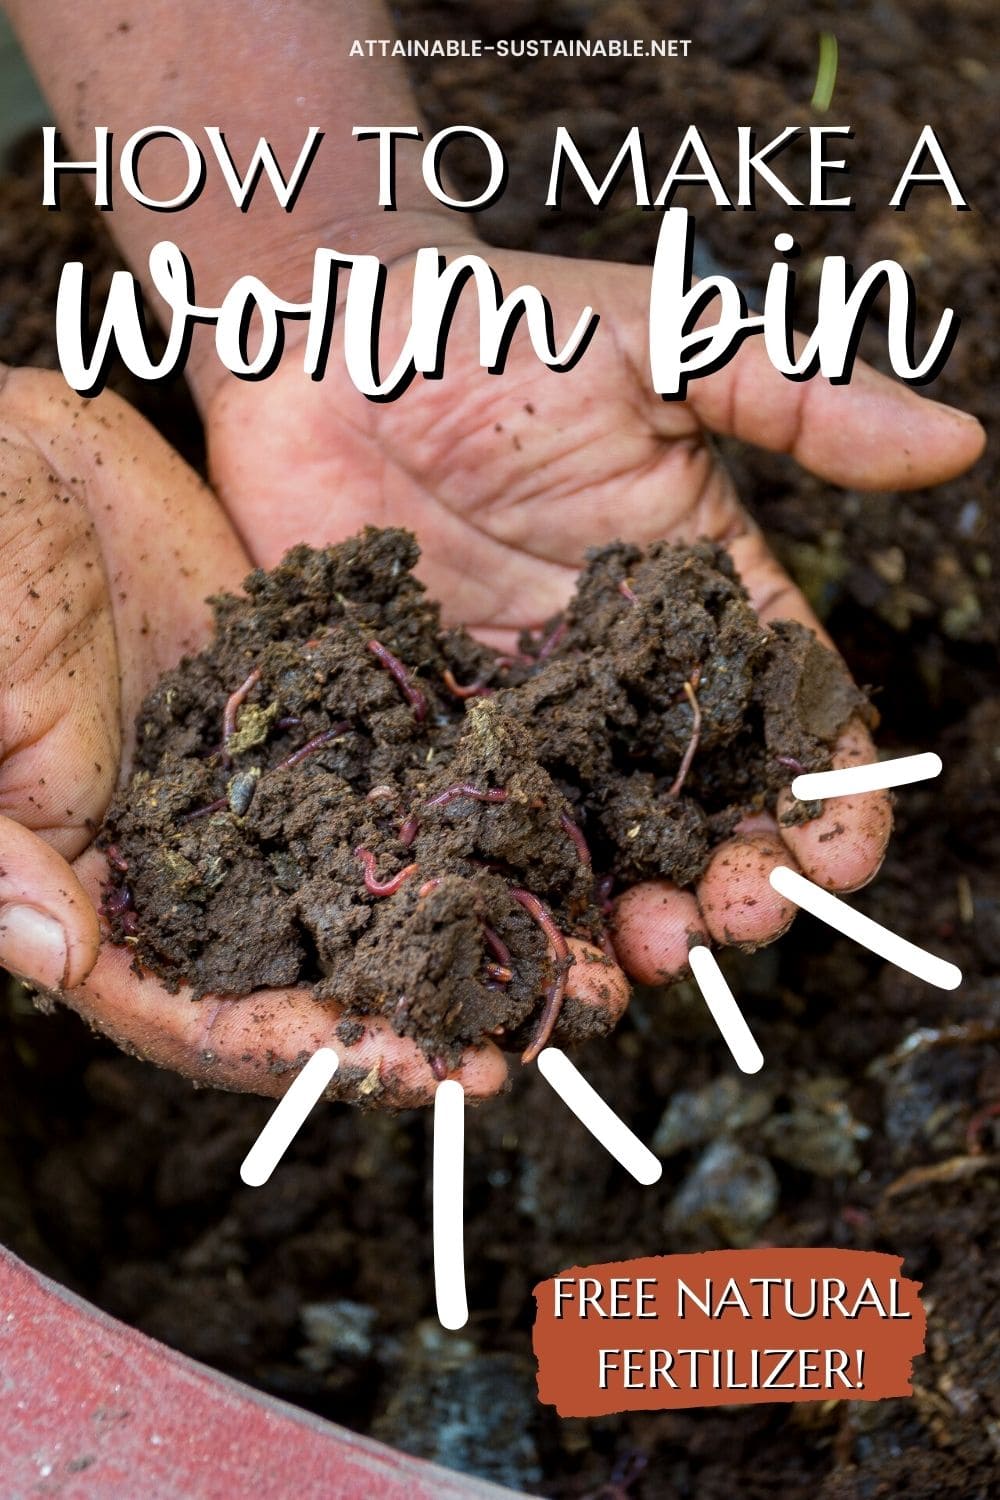
Apartment dwellers and urbanites often lament the lack of options for composting in homes with limited yard space. I highly recommend worm composting as a method for dealing with your kitchen waste. You can buy ready-made worm bins, but if you’re even a little bit handy and have access to a drill you can make a DIY worm composter yourself for under $5.
This project is featured in my book, Attainable Sustainable: The Lost Art of Self-Reliant Living.
 The 5-Gallon Garden
New to gardening? Limited on space? The 5-Gallon Garden gives you the skills you need to grow food in the space you have. Get started with your garden today!
What is vermicomposting?
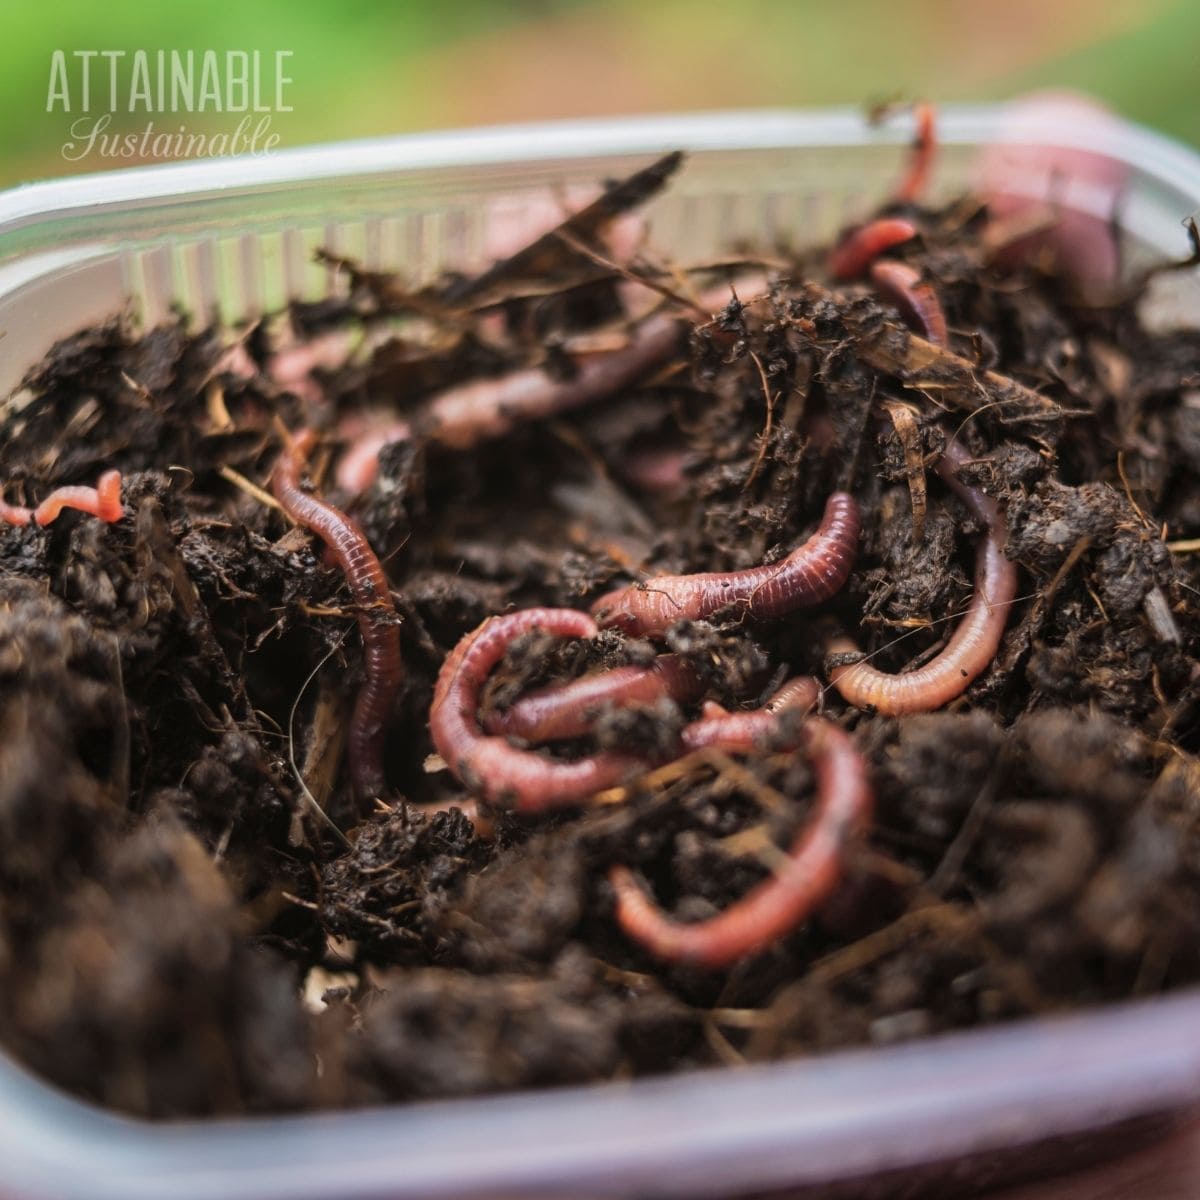
It may sound intimidating, but vermicomposting is simply the method of allowing worms to eat your kitchen waste. When worms eat, they poop. And that poop (also called worm castings) makes an excellent natural fertilizer for garden crops. And it’s free!
All you need to do is provide a welcoming environment for the worms and they will happily transform food scraps into garden gold.
It’s a great way to utilize some of the waste you create if you don’t have room for a compost bin or compost pile.
How to make a worm bin
You’ll need a couple of 5-gallon buckets to make this project. Check the local bakery for inexpensive buckets — they often sell the ones that their ingredients come in for just a couple of bucks.
Grow Some Greens!
Ready to grow fresh greens, no matter WHERE you live? Sign up for my
FREE quick-start guide and start growing some of your own food!
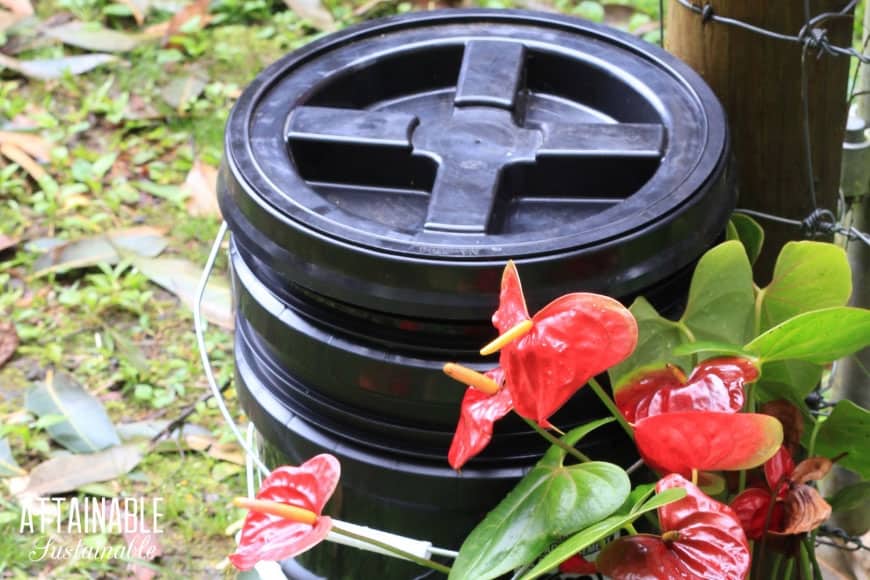
Worms like it dark. If you opt to use white or opaque buckets, you should cover the worm farm with an old towel or tarp to prevent light from permeating. Black or solid colored buckets will prevent sunlight from bothering the compost worms.
Start by drilling 10-15 holes in the bottom of one bucket (or Rubbermaid container).

The holes don’t need to be perfectly aligned; just cover the entire bottom of the bucket.
Add several handfuls of kitchen waste to the worm composter.
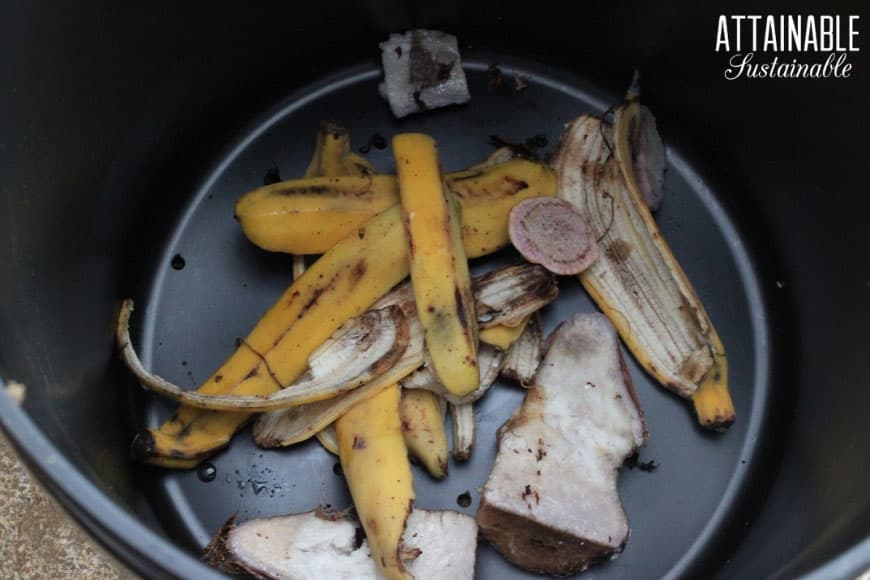
Worms will eat almost anything, but go light on citrus.
Now it’s time to move the worms in!

Shred newspaper and wet it. Drain excess water, then set it into the bucket on top of the kitchen scraps and the worms.
It takes less than half an hour, start to finish, to put this DIY wormery together.

Wet the newspaper before adding.
Related: Composting for Beginners: Compost Systems and Methods for a Groovy Garden
Using the Worm Composter
While your wormery is getting established, don’t overdo it on adding waste. Add 2-3 cups or so every couple of weeks.
Once a brown base develops under the bedding (this is the worm castings, aka worm poop), you should be able to add a bit more. The worms will multiply based on how much food is made available to them.
What to Feed the Worms
- Leftover kitchen scraps including fruit and vegetable peelings. Go light on citrus and if you add anything meaty, be sure to bury it to avoid odors.
- Coffee grounds and loose tea or tea bags. The paper coffee filter, too.
- Human hair or fur from animal grooming.
- Cardboard and paper. Remove any plastic windows or tape before adding. Items like shredded newspaper, paper egg cartons, office paper, or takeout boxes. Soak these in water and then drain before adding to the worm bin.
- Crushed eggshells.
- If you have a bigger outdoor bin, bedding and manure from chickens, rabbits, and other farm animals. Do not add cat or dog poop.
This easy vermicompost bin takes up about a square foot of space and fits under most kitchen sinks. And I promise. If you’re doing it right, it does not stink.
Expanding your worm bin
When the top bucket begins to get full, you can add a second perforated bucket. Just drill holes and add moist newspaper and scraps to the new bin like you did during set up, and set it onto the stack. Make sure the top bucket rests on the waste in the bucket below. The worms will slowly migrate up through the holes.
You may need to wrap the space between the buckets to prevent fruit flies. I’d use an old t-shirt or bath towel to fill any gaps.
When the contents of the first bucket are no longer recognizable, simply pull out the middle bucket and use the rich worm castings on your potted plants or in your garden. The worms will have migrated up and you can use the castings directly from the worm bin.
A worm bin of this size is best suited to a single person or couple. Larger households will generate more waste than this size bin can handle. Simply use the same method with larger Rubbermaid containers. (I’ve done both over the years.)
Where to get composting worms
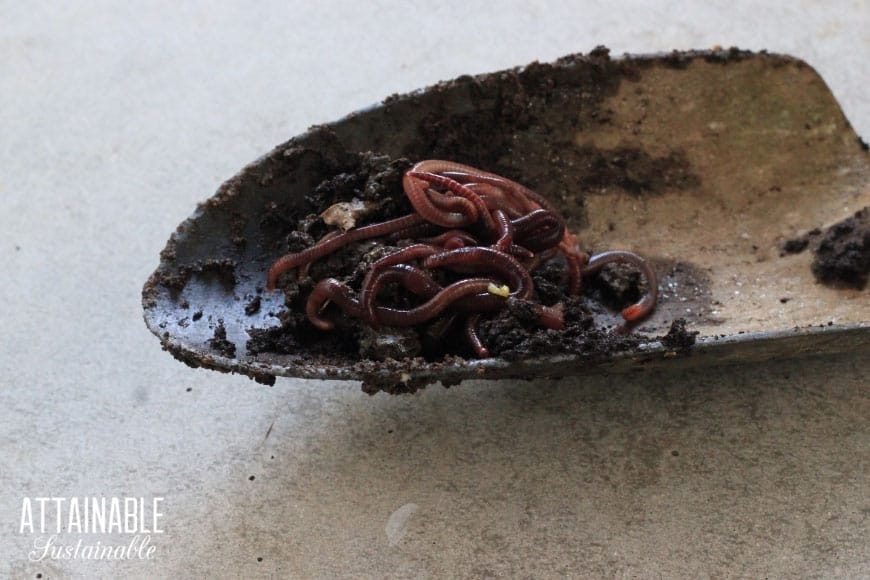
Not all worms are created equal. For this project, seek out red wigglers. They thrive in worm bins and gobble up the kitchens scraps that you generate.
You can order composting worms online. If you’d like to stick closer to home, though, talk with your local garden club or farmers market people. If you can find someone with an established worm bin, it’s easy for them to pull out a handful of worms to share.
Once you’ve acquired worms, you’ll start with a handful or two of fresh kitchen scraps and shredded newspaper.
How to harvest worm castings
To harvest the castings without adding a second bucket, dump the contents into a large piece of cardboard. The worms will move down into the castings and unfinished kitchen waste, away from the light.
Lift away large pieces of scraps. Skim off the top layer of worm castings using a garden trowel. Wait a few minutes for the worms to move deeper, and skim some more. Continue until you have harvested most of the castings, then put the worms back in the bin with fresh scraps and top it off with damp newspaper.
★ Did you love this project? Be sure to give it a star rating below! ★
DIY Worm Composter
Equipment
- Drill fit with an 1/8″ bit
Ingredients
- 2 5-gallon buckets nesting
- 1 Bucket lid
- 1 Newspaper
- Red wigglers
- Kitchen scraps
Instructions
- Drill 10 to 15 holes in the bottom of one of the buckets. This allows excess liquid to drain.
- Add several handfuls of kitchen scraps to the bucket.
- Place the red wigglers on top of the kitchen scraps.
- Shred newspaper. Thoroughly wet the shredded newspaper; allow to drain for a moment then place it atop the worms to a depth of about six inches.
- Put the bucket with the worms inside the second bucket and put on the lid. The bottom bucket serves the purpose of catching any liquid that leaches from the active bin.
- Add a handful of scraps every two-to-three weeks, tucking them under the newspaper. As the worm colony grows, they can process more scraps. Add more when the worms have eaten through most of the scraps in the bin. The worms will multiply based on how much food is made available to them.
- When there's a substantial amount of dark brown worm castings, it's time to harvest. Stop adding new scraps for a few weeks. Dump the entire contents of the worm bucket onto a piece of cardboard and expose it to sunshine. The worms dislike light and will crawl to the bottom of the pile. Carefully remove castings from the top of the pile, repeating several times until you've harvested most of it.
- Put the worms back into the bucket, and start anew.
Notes
- A worm bin of this size is best suited to a single person or couple. You can use the same method with large plastic storage containers for a larger household.
- When the top bucket begins to get full, you can add a second perforated bucket. Just add moist newspaper and scraps like you did during set up, and add it to the stack. Make sure the top bucket is resting on the waste in the bucket below. The worms will slowly migrate up through the holes.
- When the contents of the first bucket are transformed into worm castings, simply pull out the middle bucket and use the rich worm castings on your potted plants.


Wonderful post! Can’t wait to try. Question: I’m trying this with a couple of sterilite rectangle containers. But when they nest inside each other, there is very little space in the bottom. Any suggestions on how to widen the gap between contianers?
Can you use wood blocks or small terra cotta pots or some other form of spacer?
My daughter worm bin is getting heavy now. My questions are
-how long can I keep warm casting for, can I keep it in bucket for next spring?
– the liquid fertilizer at the button can be stored away for spring use too and at what temperature i should store them.
You can certainly keep the castings until you’re ready to use them. The liquid might get quite smelly? (I am slow to respond to this, sorry!)
Just stumbled on to this post. I have wanted to try this for some time. But the cost of equipment stopped me. This will.be perfect for a fun trial. I have been buying worm casings from a local man but would be nice to grow my own. Thanks
I buy red wigglers from Walmart to add to my flower beds. There are 30 and a carton for about $4. Sounds like this amount would be perfect to start my bucket. A couple questions… I live in zone 7A, would my worms be OK underneath a 3 sided fully enclosed east facing porch through the winter? Also, I don’t have dark buckets, so what happens if I use white buckets? Thanks in advance. Appreciate the article.
For overwintering you’ll need to insulate and/or move inside. You’d have to just give it a try and see how they do. A white bucket will allow sunlight in, so you’d want to wrap them in towels or something else to keep light out.
If chicken manure is put into the worm bed does that ‘cool it down’ enough to be used in the garden without burning the plants?
You’d have to let the worms make their way through it, but sure.
Do you have any tips on storing extra worm castings? I live in zone 3, and won’t be gardening outdoors until May.
A bucket with a lid?
Here in Florida we have an invasive species that actual does harm to local red wigglers. Red wigglers are less dominate now. Any suggestions?
The red wigglers will be contained in a system like this and safe.
Hi I’m just trying to figure out if there need to be holes anywhere but the bottom for air flow? Thanks so much! This method under my sink looks finally sustainable to me.
Nope, you don’t need to. It should work great under your sink!
If we drill holes in the first bucket to start, won’t the worms just leave? First timer here- about to buy worms and am worried they will just eat their fill and then run off into the ground!
You use two buckets, the bottom one won’t have holes. Put the bucket with the worms inside the second bucket. The bottom bucket serves the purpose of catching any liquid that leaches from the active bin, and you won’t lose any worms to the wild!
Possible to give us the link for where you got the black buckets? Thanks!!
I didn’t purchase them online, check your local bakery or hardware store for inexpensive buckets.
Hi please how do you store these? As this is a continuous process, how do you store the castings? I live in Alberta, with long winters. Thanks.
They can be kept inside or in the garage if necessary.
Can you use paint buckets for the worm bins?
If there is leftover paint residue in there I personally wouldn’t!
How many worms should I start with?
Is a red worm the same as a red wrigglers? Thanks
Depending on what’s available to you, a handful of worms should do it to get you started. The worms will multiply based on how much food is made available to them. As far as I know, red worms are the same as red wrigglers, but I’d double-check where you’re sourcing them from to be sure.
So do we need to put something at the bottom of the bucket for “spill” through the wholes, if that makes sense?
Put the bucket with the worms inside a second bucket, the bottom bucket will catch any liquid that leaches from the active bin.
Will spray painting translucent buckets black, or a different color have the same effect as purchasing a dark bin?
I’d cover the worm farm with an old towel or tarp to prevent light from permeating. That way there’s no worry about paint chipping or peeling off.
If you have a lid, do you need to put holes in it for aeration?
The holes in the bottom should do, but you can add holes in the lid too if you want.
Hello, I am don’t have any worms and I wanted worms for free. Is there a way to make the worms come up to your compost bin?
I’m not sure there’s a reliable way to make that happen. I’d ask a local garden club or farmers market people. If you can find someone with an established worm bin, it’s easy for them to share some worms.
Red wrigglers are available at most bait and tackle places. This was much cheaper than ordering them online, since I never did this and didn’t know how it would turn out. That’s what I used to get started with a small bin stack. Now I have enough red wrigglers to do 5-6 more bin setups, it only took 6 months.
The only way to get free worms(red wrigglers only) is to dig them up.
Good luck
Robert B.
Williston, FL
Good idea! Thanks for sharing what worked for you. 🙂
Hi Robert,
Since you have done this, I was wondering what do I have to make sure it doesn’t get too hot for them? (will the hot summer heat kill them?)
Any worms you get from your yard are not likely to be red wigglers. Local worms don’t process the waste the same way as red wigglers. You get better nutrients from the red wiggler castings. At least that’s what I read about them. And if you put local worms in with the red wigglers, I think the local worms are potentially aggressive and might overrun the red wigglers.
If you want to attract them, you’ll need to skip the 2nd bucket and just out a bucket with holes outside on the ground. I guess when you attract the worms (and maybe other crawlies), you could put this bucket inside the 2nd bucket.
Thank you for the great info. Your instructions were clear and simple to follow. I’m excited to get this started.
You’re welcome!
I just came across this site and want to try this. I think it would be helpful to include a little video as I am trying to figure out what worm castings look like and how to successfully pull them out without harming the worms. Also, do we use it straight on top of the soil or mix it up?
Mix it up. Good luck!
I want to try this project. I would keep the bucket outside. Does it need to be only in the shade or sun and shade? I am unsure if the bucket would get too hot and kill the worms?
Depending on how hot your climate is, I’d go for at least partial shade in the summer if you can. The worms can be affected by hot temperatures.
Just a little friendly tip: if you don’t own a drill you can also melt holes into plastic containers. I personally use an inexpensive wood burner, but heating paperclips(or any appropriate size metal) works just as well! Hope this helps!
That’s a good alternative!
heat the plastic a bit and you don´t have to heat the metal so much, if its for a big hole you spend a lot of gas
That’s helpful too, thanks!
Hi. I’ve got 2 boxes to begin the worm farm.
I understand that the worm casts form a liquid and drain through the holes to the bottom box and you can then pour the liquid off.
This sounds a little different to what is described above.
Thanks. Cassandra
Ps – Daniela’s trick of burying coffee grounds also sounds good.
This is a fun one for the kids to help with as well 🙂
Very interesting, sounds easy to start.
What a great idea! I just might give it a try!
I really enjoyed having a worm composter in the basement of my house, but we left it for a vacation, and came back to find out that apparently there had been flies laying eggs in the compost in the kitchen, and all the maggots had hatched while we are gone. It was dreadful. My word to the wise is make sure you don’t let flies in your kitchen compost.
I just pretty much throw my compostables out in a big pile by my garden. My chickens will scratch around and add to the pile and in the early spring I always have plenty of rich compost for my young plants.
My son was wanting to start his own bait business. I wonder if these type of worms would be the kind he could sell to fisherman?
Yes your son could sell these to fishermen.
Wow-such an easy and practical way to do it, thanks!
We always had a huge compost pile growing up in the country, but haven’t tried it in the city yet.
I have always wanted to try vermicomposting.
Vermicomposting is amazing! Truly. I just worry about having responsibility for that many little lives…. 🙂 Like you said, so long as I don’t start naming them….
I’ve only done this in my kindergarten classroom! It’s time to use this at home for our garden beds
Worm castings are a great compost!
Awesome information.
Quick and easy! We did this for a while before we purchased a layered system!
I’ve had a worm bed ever since my Dad built one in the 1980’s! He built one for me several years ago…I love it!
A worm composter sounds like a great idea in our townhouse! I’ll add it to the list of homestead projects. It looks easy enough that it will probably get bumped to the top. So excited!
Aloha Kris, Thanks for the great info.
I just got my urban worm bin and am in the process of getting it operations. I am excited that I will have worm castings to use in my garden next spring.
Wow! I was just talking with a neighbor today about worm bins! It’s time to set one up again at our neck of the woods. Thank you, Kris! I would love to have a copy of your book, and some Aloha!
Aloha to you!
Worm castings are wonderful!
I used to raise chickens. They were so much fun. Wish I could do it here but we have HOA rules against them.
Best eggs ever!
If you have a garage or basement, with any natural light available…or use the new low wattage LED plant lights…why not build a small coop with a small yard for them, using straw or woodchips for bedding, feed them your grass cuttings and weeds. Your neighbors won’t know, and you’ll have a win for liberty…happy hens, and the best eggs ever?
And, depending on yur lighting options you could even put in a couple of large fabric container beds and grow some food at the same time. I have converted half of my bathtub to growing a hydroponic container garden….I eat fresh greens, lettuces, arugula, bok choi, varieties of kale, massive quantities of several varieties of basil, cilantro, garlic chives, rosemary, and tarragon… salads, peppers, eggplant, tomatoes, sugar pod peans, pole beans, and sometimes I have success with strawberries. It took a year of frustration to figure it out and gain success…mostly getting the nutrient solution right, companion planting just like regular gardening, and application of prophylactic natural pest treatments to keep pests away, before they get started…I almost gave up, but, just as I thought it was hopeless, it suddenly took off and I really don’t have to purchase much in the way of vegetables anymore….your chicken flock wouldn’t suffer from living in a basement, and in fact they would even gobble up pests if they appear. If I had a basement of garage or balcony…I’d have it intensively planted and I’d keep a couple of chickens too!
I have tried vermicomposting in the past. The rich compost you receive is excellent for any garden.
Hi Kris,
I’m so glad that you included this vermacomposting in your contest. This is not something that I had paid any attention to.
Last spring, I bought a black plastic composting bin , thinking I would make a huge container of compost. I can’t tell you how many times I’ve ‘filled it to the top’ and had it disappear to the bottom in a few days. After several months, I doubt if I have 4″ of compost that is usable. I bought worm castings on the internet for feeding my plants, but I had so many, couldn’t afford to buy any more.
NOW, that you have given us this great information, I will never have to buy worm castings again!!!!
THANK YOU SO VERY MUCH!
Suzanne
We made a worm bed from an old RV refrigerator several years ago. Worked great. Was insulated so we kept in outside.
Oh my goodness! This is everything my fiancé wants to do! I just sent him the link for this page!! Thank you Kris!
This is a great article. We have worm bins at our community garden and love harvesting the castings. We have two official “worm wranglers” who will appreciate some of your valuable tips and insight! Thanks so much
I did it! I made us some mustard from your recipe, it is delicious and so easy to make. Thanks for your recipe.
This will be great for city living and easy for one person to make.
Thank you .♥️
Thanks for the info. I’m excited to try this.
I’ve been wanting chickens for a few years now. But unfortunately, my husband doesn’t want to spend the energy to build me a coop. I cannot afford a store bought coop, and am disabled, so cannot build it myself. It would be so much healthier to have fresh eggs. Maybe somewhere, Santa is listening! LOL.
And, depending on yur lighting options you could even put in a couple of large fabric container beds and grow some food at the same time. I have converted half of my bathtub to growing a hydroponic container garden….I eat fresh greens, lettuces, arugula, bok choi, varieties of kale, massive quantities of several varieties of basil, cilantro, garlic chives, rosemary, and tarragon… salads, peppers, eggplant, tomatoes, sugar pod peans, pole beans, and sometimes I have success with strawberries. It took a year of frustration to figure it out and gain success…mostly getting the nutrient solution right, companion planting just like regular gardening, and application of prophylactic natural pest treatments to keep pests away, before they get started…I almost gave up, but, just as I thought it was hopeless, it suddenly took off and I really don’t have to purchase much in the way of vegetables anymore….your chicken flock wouldn’t suffer from living in a basement, and in fact they would even gobble up pests if they appear. If I had a basement of garage or balcony…I’d have it intensively planted and I’d keep a couple of chickens too!
What do you do with the other half of your bathtub?
sorry….I replied to the wrong comment….but I wish you luck in getting a coop built for you! If I lived near you, I’d offer to do it for you….
Good info. Have tried to compost with little success. Havent heard of this option before.
This would be a great educational project to do with my nephews when they get into gardening in the future.
I love my worm bins, but I’m not totally pro yet. My kids and I decided to fill our jack-o-lantern with worms, etc. from our worm bin. We nestled it back in and voila, there’s only a little skin and stem left. My 5 year old was shocked! Super fun. It really is amazing to have worms and don’t know why it’s not “normal” for everyone. Besides all the sustainability reasons, having a worm bin means less garbage to haul, less stink in your garbage, and less pests attracted to your garbage. Win, win, win, win!
I’ve been basement bin composting for a few years now. The 5 tray bin with drain spigot came from my sister. My wiggle worms were gifted from the daughter I use to care for. A some questions though: What can you do with the “worm pee”? I don’t exactly know but I do mix it with water and water my gardens with it during the summer. However I have gallons of it. I even give bottles of it away.
How do you separate the worms from the castings? I have tried the Half tray castings and half new food. In theory the wigglers are to migrate to the other side, Mine don’t. I’ve tried the scoop the top as well, but there is so many of them It’s really hard to separate. I even put a spotlight above them to get them to shimmy down.
I had flies this year for the first time. Yuck! My solution? Old school..smash every egg I found, added damp news paper on top and covered with the lid. Waited several days, checked for more eggs. Once most were gone I started a new bin. It’s been about a month since the new bin and No more flies. Happy me.
What kinds of kitchen scraps do you use for this
Wormery!! Omg the cutest word! I compost in a black plastic bin and it does work wonderfully and fast. Gonna make a wormery now. Love it
I never thought about this type of composting. Everything else from the book I’ve tried has been a success Off to find worms.
Thank you for sharing. I have been composting for years and now I will be Vermicomposting also. It seems quite easy, although when I teach or show something I let people know nothing is easy until you learn it.
I like to teach the children in the neighborhood about the good earth and what it can give us. I have also skimmed through the few pages that is shown of your book. Wonderful.
Wonderful plan. Bucket of worms for Christmas present? I have a couple sons who would like it. I printed out the directions a year or so ago; then, promptly forgot about it. Will get busy on that. thanks again.
Weekend project for me! Thanks much.
Great information! But don’t quite get how to put a 2nd worm bin to an existing done worm bin. Is it put above the done bin or beneath it? Should the done bin be quite full and thus close to new food so that the worms are able to quickly find the existence of the new food?
Yes, add it to the top of the stack. As long as it’s sitting ON the “done” contents, the worms will migrate up.
What is the temperature suggested for this method? I’m assuming we would want to keep the worms in a dark bucket somewhere where the bucket will not overheat, is that correct?
You want to keep them from extreme heat — so a shady spot — and extreme cold. They’re pretty hardy, though.
Oh! Does that mean we can have these worm bins outside like in balcony during winter time ???
That should work!
“Put the bucket with the worms inside the second bucket and put on the lid.”
How do the worms get oxygen?
There are holes in the side of the bucket. If your buckets fit together really tightly, you could use a block to prevent that.
The instructions only say to put holes in the BOTTOM of the top bucket. So you now say there needs to be holes in the sides of the top bucket also? How many? How far apart? All the way to the top, or halfway, or less?
Just trying to get this straight so I can try this, but do NOT want loose worms in my home!
I plan on making one of these with either some extra totes or bakery buckets. I live in AZ up in the mountains. It can hit 90 in the summer and below freezing in the winter. I’m a single mom and think this would be so awesome for my daughter to help with. We started a wonderful Garden this year. She is 4. I live in a trailer home and I read that worms don’t like vibrations I’m a little worried our really old washer that shakes all over the place may disrupt them. Any tips and anywhere that sells super cheap red worms 20 plus is a little steep for our budget. Thank you so much
You might try a fishing supply store if you have one nearby.
What size are the containers in your picture? I’m trying to determine the smallest size one could use for worm composting.
Thanks
What is the ideal temperature for this worm composting? I have a basement grow room that I keep at 80-85°.
That should work fine. I find that when it’s warmer than the worms like, they’ll burrow closer to the center.
If you have the space available, plastic storage bins with lids are great for composting. We have 3 sets and have enough worm casting to share with our gardening friends. Vermicomposting is great fun.
How do you know when you have too many worms and need to share or make another bin?
The worms will moderate their population. They won’t overcrowd themselves. They lay eggs that only hatch if there is sufficient food, according to a worm expert I talked with years ago. If you have lots of waste, make another!
Will this work in Hot windy dry Oklahoma? I’ll try it if it works here. I’m originally from illinois farm country and we dug worms all the time to go fishing. Same technique for you dry windy country? Thanks for your help. Farmer Franci
I don’t know why it wouldn’t. Just keep it in the shade during hot times and make sure the moisture level remains good.
Walmart has red wrigglers for $3.88.
Interesting!
It seems as though it would take forever to get any measurable amount of compost if all you add is 2-3 cups of waste every couple of weeks. Think of all the potato peelings alone you are throwing in the trash every day because you can’t put them in the worm bucket. And that’s just potato peelings!
If you create a lot of waste, you could definitely use this method with a larger container.
Do you have to stir the bins every so often? Do the worms take care of that part for you?
The worms do ALL the work! The only time I fiddle with it is to harvest the castings.
I noticed you only put holes on the bottom of the bucket – the worms are able to survive like this?
I live in Colombia and want to create something similar using plastic trash cans to put on my balcony. Do I need to drill any holes on the sides of the cans or will the worms survive just fine on the air inside the container?
You could easily add a few holes in the side of the bucket, too, if you like!
I made this a few months ago because it was the perfect solution to my small apartment. I’ve tried other setups before but they were too small, so everything I did wrong was magnified and I ended up killing the worms. But this is PERFECT. I can have multiple set-ups throughout my apartment. Thank you so much for this!
How long would it take for a worm hive to produce usable tea and castings? If I were to start the worm bed now, would I be able to feed about 40 plants this season?
It depends on a lot of factors. When you say “this season” I assume spring in the US. My short answer is yes – you’d be able to start pulling castings by then; at least enough to use to brew some worm tea. I watched a presentation the other day and the presenter (with an established system) was harvesting castings in a week. One thing he does to make it move so quickly is to grind everything before giving it to the worms. This way, they process through it faster. So that would be one way to speed up the process to have more for spring!
I tried the double and the single bucket method but both scenarios, I couldn’t keep the worms in the buckets. Think I need something air tight.
I suspect that they’re leaving (or trying to) for a reason. Too dry? Too wet? Too hot? I do have an occasional few up at the top of the container, but not mass exodus.
Its likely that the environment is acidic. I came across an article about vermicomposting and that was one of the reasons wroms might try to leave the bin. Try adding more paper to the top and less acidic foods to the bin like crushed egg shells, veggies like potatoes or lettuce. Remember not to use printed paper other than news paper as the ink is also acidic in many cases. Im starting my first worm farm this weekend but this is some of the information I have come across in my research.
Question, I eat fruit everyday so I have banana peels, strawberry tops, etc. Do I just drop them in everyday or save them in the fridge and do them once every couple weeks? Also, apple cores and fruits with seeds, can I add those or will a tree grow?? Haha. Thanks!!
You can drop them in as you have them, but be aware that you CAN overwhelm a colony with too much. That said, it’s pretty cool that worm eggs won’t actually hatch until they “know” that there’s enough food available.
In the uk your red wiggley worms are called tiger worms and you don’t need to buy them. They live deeper in the soil than regular worms. If you put your buckets outside after you put your kitchen scraps in as they say, ‘if you build it they will come’, if it works here I don’t see why it shouldn’t for you.
Petco sells red wigglers for about $5
Worms can’t eat onions, citrus dairy or meats. I’ve had red wigglers for 3 years or better and they are doing quite well. If your going to use them in your vegetable garden don’t feed meat or feces from anything that consumed protein. Chicken, goat, lama, cow or horse would be perfect but you have to smell it too.
Yes, but fresh manure can produce too much heat when it’s breaking down and I’ve also heard that it’s too acidic for the worms.
Do I need to replace the wet newspaper
Usually the wet newspaper is just used at the start. It will last for a couple months; by then, the worms will have created a nice “bed” of vermicompost that they’ll hide in. Use newspaper every time you start fresh, though.
Thank you for sharing your knowledge for free. What love! 🙂
I can’t wait to do this. So how about giving the worms some old leftover great bean casserole? Do they eat the newspaper too? Do I lift up the newspaper when adding more kitchen scraps and put the scraps directly on worms/castings? I am brand new to composting. Everyone is mentioning digging trenches and getting the scraps down to the worms. Thx for taking the time to post this and for answering our questions.
Yes, they eventually eat the newspaper, too. Amazing. And yes, just lift the paper and tuck your kitchen scraps right onto the waste.
Could i use the tall plastic cat litter containers? I usually get litter in cardboard boxes, but will get a few plastic ones for composting
I don’t see why not!
Hey, I just made one, but you don’t say anything about letting oxygen into the bins. Should I drill a hole into the top?
Not in the top, no.
Are the rubbermaid tubs food safe?
They’re not food grade, no.
I love the idea….however, are there any alternatives for containers. Plastic leaches nasty chemicals into your compost making it unusable.
You can buy wooden worm composters online.
I may have missed it, but are holes drilled in the bottom of the top/second container also?
I have been wanting to start composting and to find something useful to do with all of my empty tidy cat containers. Now I have the solution to both! Thank you!
I live in Ohio would it work to put the bin in the garage in the winter or will that even be to cold?
You want to keep them above 40 degrees or they’ll die.
what do you mean by “get a chicken helper”?
I can’t wait to do this I live in a small older trailer so space is tight
What do you mean by “find a chicken helper”?
Oh, I was kidding – see the chicken in that photo? 😉
Ahhhhhh, you are funny lady. Cheers, Cap Carl
Great post. I.started with my DIY compost bin about 2 months back and used pots (plants’ pot) because I don’t own a drill & and these already came with 3 holes! Set it on a pot holder and left it out in my garden. Been adding my raw (no meat) waste to it without any worms and discovered it has fungus and would like substance growing on it 🙁 I live in a tropical climate. The only extreme weather is heavy thunderstorm but mine bin is covered. Am I doing it wrong? Can I buy and add some wriggly worms to it now or do I need to start fresh?
Thank you
Fungus and mold are all part of the breakdown process. Hard to say without looking at it, but I think you could add worms now.
check out unclejimswormfarm.com. I’ve bought mealworms to raise for my chickens and will be getting my wigglers from them as well.
I’d be interested in hearing more about meal worm farming, I think my girls would love them.. Thank you
Can the bucket live outside? I live in a small apartment in Georgia. The winters are not ridiculous, but I’d imagine still colder than worms would prefer. How tolerant are they?
I’ve had mine outside in Northern California winters with lows of 14 degrees.
Do you have to empty the liquid from the bottom bucket? Does the system get dirty after a while? I imagine creating a big mess when taking the top bucket off to empty the bottom bucket.
If itʻs working, the active bucket should be just moist, not sopping. You just lift it out of the lower bucket, set it on a piece of newspaper and empty the lower bucket – hopefully into a watering can where you can dilute it (I use *roughly 1 cup of worm juice to a gallon or so of water) and use it to feed your garden.
So grateful for the red wigglers you gave me a couple years ago. I now have two worm bins and LOVE IT! They go crazy if you grind up their food in a food processor. They multiply prolifically. I have since shared my worms with others, like you did with me. I get all the “juice” out every two weeks, add water and fertilize my plants. MAHALO!
Youʻre so funny. But I get you. They are so nice to have, and Iʻm glad youʻre passing them along!
I’ve had my “worm farm” going for about 2 years. When I do a big vegetable tray and have a lot of veggy waste, I put it in my blender and make “worm slaw.” Then just dig a trench in the worm farm and pour it in. The worms go crazy because it is so easy for them to eat. I found it so much easier to do this than to try to bury the pile. I use wet peat moss instead of newspapers. Then I can just mix it with potting soil or regular ground soil. I have mine in 4″ deep totes. It gives me plenty of room to bury coffee grounds, egg shells, and veggy scraps, really anything besides meat or meat products . The down side, of using this size tote, is lifting to get to the bottom tote.
“Worm slaw.” Love it.
Peat moss sequesters carbon, which is released into the air when used in the garden, contributing to climate change. It is harvested from beat bogs, very cheap to harvest, cheap to buy, but each of those bogs supports enormous amounts of critters that lose their homes when the peat moss is harvested. The shipping from where it is harvested to your local garden store also contributes to climate change. So using peat moss contributes to climate change in three huge ways.
Please, please, do not use peat moss in your gardens, for anything. Or in anything. I have stopped buying potting soil that contains peat moss for this reason. I learned this when making a cranberry bed, which recommended lots of peat moss to create a bog like environment. My research led me to use coconut coir to hold the moisture. Along with other recommended nutrients, I added mycorrhizal fungi, which peat moss has but coir doesn’t.
1/8th inch holes are big enough for the worms to move through if you decide to stack buckets?
Should be – they get pretty skinny! If you’re concerned, though, bump it up a size or two.
Or paint the buckets to create the dark space.
** Ask your local bakery for a couple of buckets, they will usually give them to you for free!
I started one of these about five days ago. Opened the lid to put stuff in today and there was a butterfly on the inside lid! Anybody have any ideas where it came from???
I would love to do this. I live in Phoenix and am wondering if I should keep this inside uear round or if cooler months if it could go into an outdoor shed?
Mine are outside, year round in a temperate climate. You just want to keep them from the extremes – super hot weather and freezing cold.
I keep mine in the garage (unheated) all winter. As long as it doesn’t freeze they are fine.
I would love to try this! But on a slightly larger scale as there are 4 of us …. my question is, What should I not put in there ? (New to composting )
Avoid adding meat — it’ll get stinky.
I use a Rubbermaid 3 gallon container (with lid) sitting on a tray (to catch stray worm escapees). The setup sits on top of the recycling bins in the kitchen. Don’t feed onions, citrus or fruit, or meat/protein scraps. (You can feed fruit if you like those nasty little fruit flies flying around the kitchen – I don’t.) I cut up the food as fine as I can with a sharp knife. And yes, they do like those slimy things from the back of the crisper drawer.
If you have Freecycle or Nextdoor Neighborhood in your area you could try asking for surplus worms from an existing vermicomposter. For example, I started with a cup of worms less than 2 years ago and have now raised enough to start off 6 bins for other people. And very soon I’ll have to split off another batch of worms.
I’ve passed many worms on to new homes! (I never bother with cutting up the things I throw to them, though!)
does it need to be a certain kind of plastic? or can you use any type of tub?
Any type of tub should work. I’ve seen something similar done with Rubbermaid containers as well.
If you’re keeping your bins outdoors, look for tubs meant to be outside — like small trashcans. I bought some bins that I get compost and manure in from local farms and they get brittle very quickly if they are exposed to sunlight.
I’ve got three of these (Rubbermaid totes) in my back yard and I swear they do a much better job than a traditional composter. I had my sixth grade class do this as a project two years ago and we even made the news – It’s really a great project.
did you drill more than one hole for the totes?? wondering?
Sheryl, this can definitely fulfill that need to compost in small space situations. I hope she tries it!
So interesting. Forwarding this to a friend, a former rural-dweller, now an urban-dweller. She will be so happy to find a solution to missing her composting!
Thanks for the worms and great post! It’s a little weird how excited I am. Over worms.
I’ll only worry when you start naming them.
I just got my worms as well and I am over the moon about my worms! 😉
Hi Kris,
That’s a great idea, but with the buckets being translucent, I hope you’re keeping them in a dark closet. As you know, worms hate light more than onions. That’s why opaque bins or totes are recommended. If they are under any kind of stress caused by light, they will hunker down in the middle while leaving the lighted areas alone (as far as feeding goes).
Under the sink? I’d say that’s plenty dark, yes?
Sure ‘nuf.
My daughter went off to college in Portland and came home committed to organic gardening, and she started worm composting in her dorm. I’ll show her this post and see if she wants to implement this here at our house, thanks for the plan!
My son is off to college and utterly disturbed to not be composting. I suggested this plan to him, too!
Hmmm – now where to get the worms w/o spending $20.
Any fishing supply store sells earthworms… fairly cheap also…
You actually need red wiggler worms. The ones in the fishing stores usually aren’t the same kind. At least I have never seen red wigglers in the fishing stores.
Go outside and dig up the worms, the world if full of them.
It certainly won’t hurt to try, but garden worms like to burrow whereas red wigglers are content to stay in tight quarters.
How could I have them mutliply enough that I could regularly feed my chickens worms? Any suggestions? Tia
The worms will multiply in relation to the amount of food available. Increase their food in increments, and you might need to increase the size of the container.
Our bait stores in southern Ohio do sell red wigglers, so you might want to check yours.
Bait and tackle shops usually have red wrigglers.
I learned an amazing trick. Find a nice damp spot in the garden where the dirt has been shifted through and fluffy dig a little and see if you find any local worms. Usually you see a few. Dig a home, bury some used coffee grounds and wait a week. Then dig it up and you will have a huge supply of healthy, local worms suitable for living in your area!!!! It really works.
I asked a neighbor who composted. 🙂 Free worms!
What an easy and neat way to have a vermiculture system! Mahalo, Kris!
This sounds great for city living. Thanks for the tip.