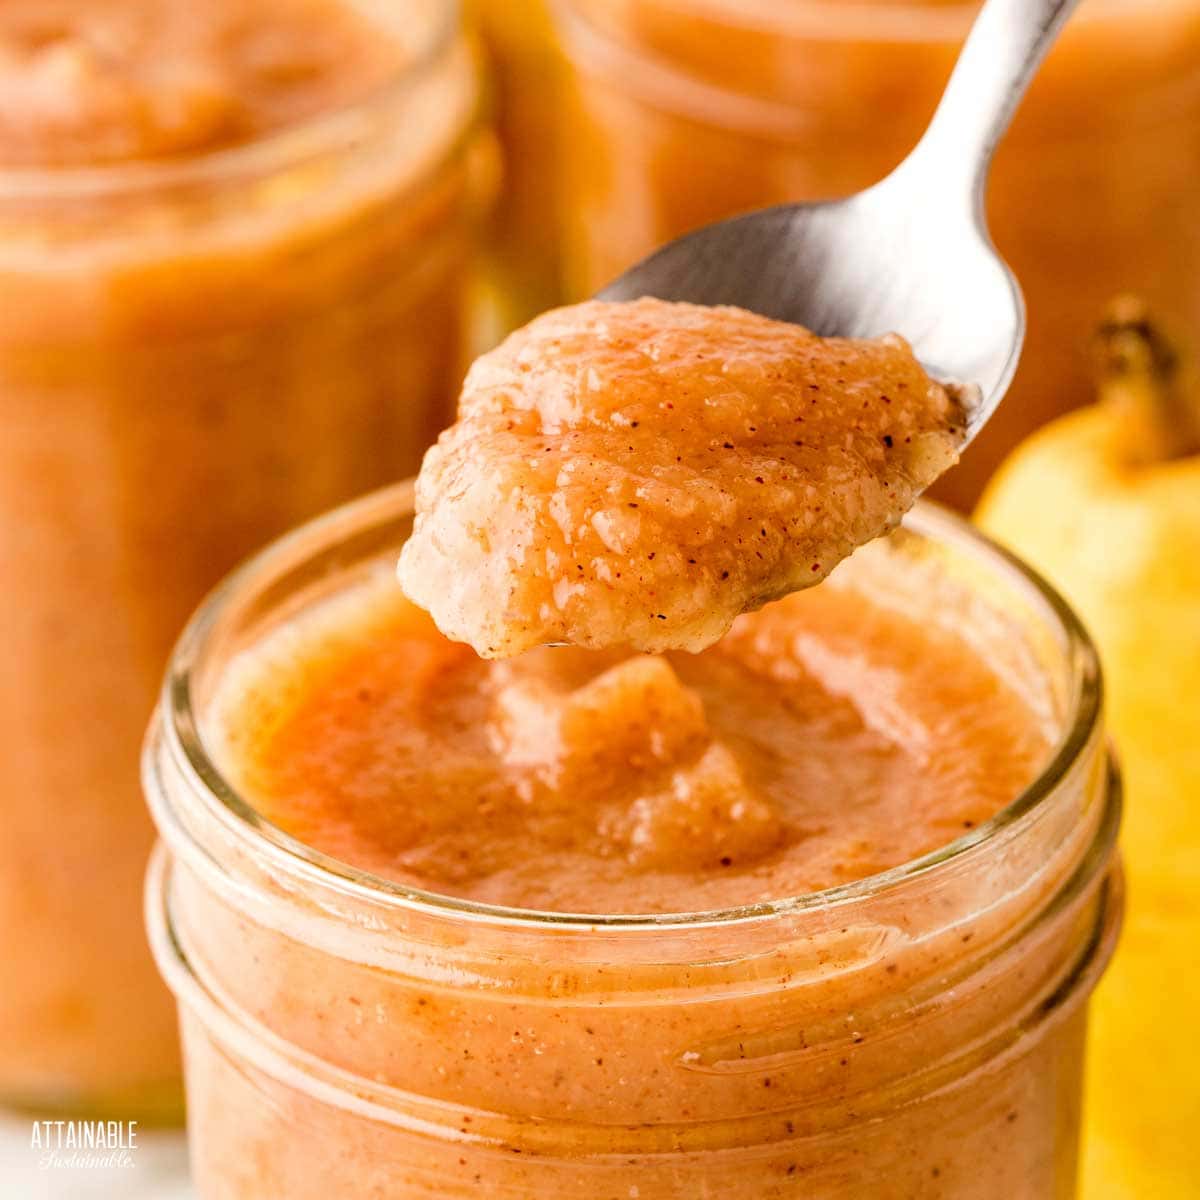
Capture the flavor of pears in this easy pear butter recipe. There’s no added sugar, just the sweetness of the fruit and some warming spices that will make this fruit spread a family favorite!
Fruit butters are made by cooking and reducing fruit until you achieve a concentrated spread. One of the great things about making homemade fruit butters is that you can make them entirely without added sugar, trusting the fruit to provide enough sweetness.
I’m a certified Master Food Preserver and all of the canning information you’ll find on this site comes through the lens of SAFE canning, following USDA guidelines.
 Ready to DIY your pantry with more wholesome ingredients? Check out my new book from National Geographic! Attainable Sustainable Pantry is filled with delicious recipes for some of your favorite condiments, snacks, and toppings, along with an entire section on safe home food preservation. It’s the guide you need to start skipping packaged products and embrace homemade.
Homemade Pear Butter
Apple butter often gets all of the fruit butter glory, and is more readily available commercially than other fruit butters. This delicious pear butter holds its own against its more famous counterpart, though. And it’s easy to make at home!
Ingredients
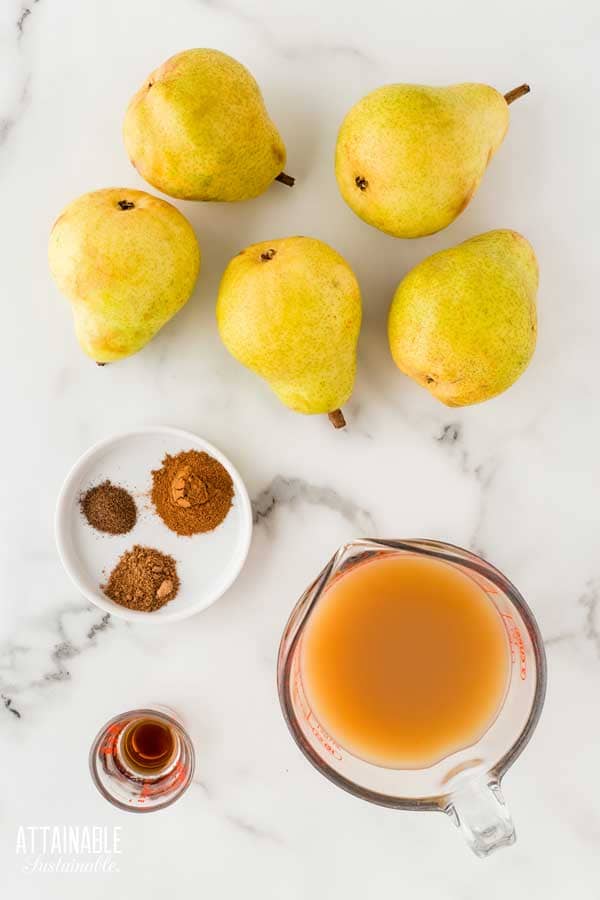
Pears — This recipe can be made with different varieties of pears. Bartlett pears, Bosc, and D’Anjou are all good choices. Choose your favorite, and make sure the fruit is fully ripe. The natural sweetness of the fruit is what allows us to eliminate added sugar.
Get a Quick Start Guide to Safe Canning!
Want to learn how to preserve the harvest? Dive in for a look at various canning techniques and methods! Grab my FREE 6-part guide to getting started.
Juice — If you can find pear juice, that is a great choice. It’s kind of obscure though, so I’ve actually called for apple juice in this recipe. Either works!
Spices — Cinnamon, nutmeg, and allspice add an earthy richness to the pears. If you prefer a more deeply spiced spread, you can safely increase the amounts of these dried spices.

Slow Cooker Pear Butter
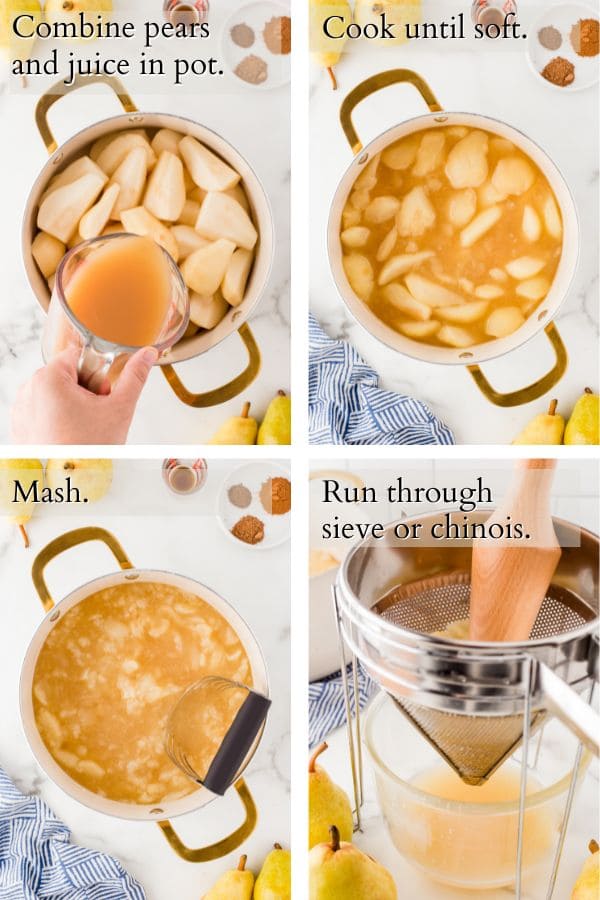
Use a sharp paring knife or peeler to remove the skins and cores of the pears.
Combine pears and apple juice in the crock of the slow cooker and cook on high for 4-5 hours or until the fruit is very soft.
Making Pear Butter on the Stovetop
To make this recipe without a slow cooker, combine pears and apple juice in a large stockpot. Cook over medium heat until the apple juice begins to boil.
Turn burner down to low heat and cook, uncovered, for several hours or more, stirring regularly with a sturdy wooden spoon. As the mixture thickens and reduces, you’ll need to stir more often to prevent sticking and scorching.
Cooking it Down
No matter which method you use to cook down the fruit, once it’s soft, transfer cooked pears to a food mill, sieve, or chinois and press through to make a fine texture. Alternatively, you can use an immersion blender to create a fine texture.
Return pear pulp to the slow cooker or stockpot along with remaining ingredients. Cook until thickened.
Your house will smell wonderful!
Testing for Doneness
Spoon a small amount of pear butter onto a plate. If the it separates and liquid appears around the edge, keep cooking. When the pear butter retains its mound shape without separating, it’s ready to be processed.
Water Bath Canning Instructions
You’ll need special canning jars (aka mason jars), lids, and rings to make this a shelf-stable product, but the process isn’t difficult.
This recipe can be made in quarter-, half- or pint-sized jars.
🍅 Safety First!
Canning is an excellent way to preserve food for the pantry, but there are some important safety considerations to keep in mind. The recipes on this site have been made following safe canning procedures by a certified Master Food Preserver.
- Know the difference between water bath canning and pressure canning. Low acid items must be pressure canned for safety.
- Altering ingredients may change the recipe’s pH, posing a safety issue.
- Use the proper jars and lids. Never reuse lids, with the exception of the Tattler or Harvest Right hard plastic lids that are intended for such a purpose.
- For more on canning equipment, please go here.
- Want to learn more? The National Center for Home Food Preservation is the go-to resource for safe canning information.
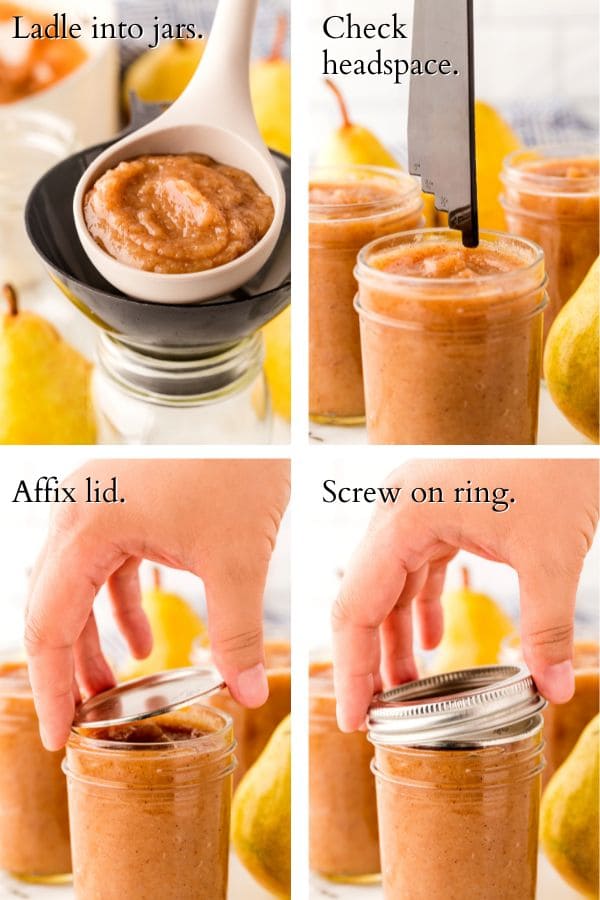
Transfer hot pear butter into canning jars, leaving a quarter-inch headspace. Use a non-metallic knife or bubble tool to remove any air bubbles. Wipe the rims of the jars, removing any residue.
Place the lids on and process them in a water bath canner. What this means is you’ll put the filled and sealed jars of jam into boiling water and heat them for ten minutes. This assures that the jars will seal well and kills off any potential bacteria in the jam mixture itself.
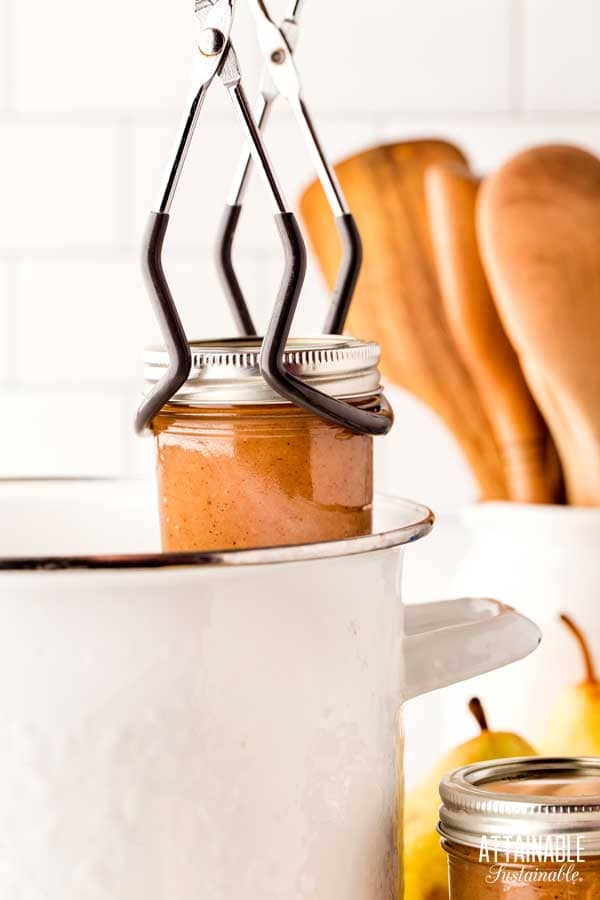
Use a jar lifter to remove the hot jars to a towel-covered countertop and allow to cool fully. As they cool, you’ll hear the little “tink” sound of the jars sealing. Store any unsealed jars in the fridge and use those first. (This is unusual, but it does happen once in awhile.)
Remove the ring from each sealed jar of pear butter, rinse to remove any sticky residue, and store canned pear butter at room temperature in a dark place such as the pantry.
Opened jars should be kept refrigerated; they’ll last in the fridge for several weeks.
Using Pear Butter
With its fresh from the orchard flavor, this fruit spread is a versatile addition to meals and desserts.
- Spoon warm pear butter over vanilla ice cream
- Spread into a peanut butter sandwich
- Slather it onto warm English muffins
FAQs
Can I make this recipe in my Instant Pot?
Yes and no. You can do the initial cooking of the pears in an electric pressure cooker. Once the fruit is processed through the food mill, though? You’ll want to let it cook down more slowly than an Instant Pot will allow. The sauté feature on an Instant Pot has one temperature: HIGH. That is going to cause the pear butter to bubble and splatter and quite possibly burn.
Do I need to add lemon juice?
While many safe canning recipes require the addition of lemon juice, this recipe is sufficiently acidic without it.

★ Did you love this recipe? Be sure to give it a star rating below! ★
Easy Pear Butter Recipe for Canning
Equipment
- 8 pint jars adjust quantity for quarter-pint and pint jars
- 8 canning lids and rings
- canning funnel
- water bath canner with lid or deep pot
- jar tongs
- canning bubble popper/measurer optional but handy
Ingredients
- 12 pounds ripe pears
- 3 cups apple juice
- 2 teaspoons cinnamon
- 1 teaspoon ground nutmeg
- ½ teaspoon ground allspice
- 2 teaspoons vanilla
Instructions
Recipe yields 8 pint jars.
MAKE THE PEAR BUTTER
- Peel, core, and quarter pears.12 pounds ripe pears
- Place pears and apple juice in a slow cooker or in a large stock pot.3 cups apple juice
- For slow cooker: Cook for 3-4 hours on high or until the pears are very soft.
- For stovetop: Bring to a boil over medium-high heat. Reduce heat and simmer, stirring frequently for about an hour or until pears are very soft.
- Use a potato masher to break up chunks of pear.
- Working in batches, run cooked pear pulp through a food mill, sieve, or chinois.
- Return pear puree to slow cooker or cooking pot.
- For slow cooker: Tilt cover to allow steam to escape. Cook for another 6-8 hours on low, or until pear butter is thick and holds its shape on a spoon. Add spices.2 teaspoons cinnamon, 1 teaspoon ground nutmeg, ½ teaspoon ground allspice, 2 teaspoons vanilla
- For stovetop: Simmer over low heat, stirring frequently for 2-3 hours until thickened. The pear butter should hold its shape on a spoon. Add spices.
PREPARE FOR CANNING
- Wash the jars you'll use, making sure each is clean and free of nicks in the rim, which could impede sealing.
- Wash the lids and rings in hot soapy water. (If you're using non-Ball brand lids, prepare as suggested by manufacturer.)
- Place empty jars in a canning pot or large stock pot with enough water to cover by an inch or two, cover pot, and set on high heat. It can take awhile for the water to heat, so get it started about 30 minutes before pear butter is done.
CANNING
- Ladle hot pear butter into jars, leaving 1/4" head space. A canning funnel makes this easy.
- Wipe jar rims to remove any fruit mixture that may have spilled. A clean rim is essential to a good seal.
- Place lids centered on the jar rim. Screw bands on finger tight.
- Use a jar grabber to gently submerge jars into hot water in the canning pot. Water should cover the top of the jars by an inch. The water will cool somewhat in reaction to the addition of the jars. Return the water to a simmer and then set the timer.
- Process for 15 minutes 0-1,000 feet altitude; 20 minutes 1,001-6,000 feet; 25 minutes over 6,000 feet.
- Remove jars from water using the jar lifter and transfer to a solid, towel-covered surface. Listen for the popping sound of the lids sealing (a canner's favorite sound!). Allow to cool for 24 hours.
- Check seals. Lids should be solid and pulled down tight. (if they flex and pop, the jar didn’t seal; put unsealed jars in the refrigerator and use those first).
- Remove rings and wash outsides of jars. Store in a cool dark place.
Notes
- Recipe yields 8 pint jars.
- This recipe is made without the addition of any sort of sweetener. If you prefer a sweeter fruit spread, it is safe to add granulated sugar, brown sugar, maple syrup, or honey to this recipe. Add it in small increments until you're happy with the flavor.
- This recipe can be made in quarter-, half- or pint-sized jars.
- Boiling lids or heating above 180°F as once recommended can damage the sealing compound.
- SOURCE: Adapted from the Ball Complete Book of Home Preserving, page 57 (variation). Recipe tests at 3.0 pH.
- Apples and pears may be safely interchanged in canning recipes: https://uwyoextension.org/uwnutrition/wp-content/uploads/2023/11/NDSU-play-it-safe-fn2102.pdf
Nutrition
Have plenty of pears? Try canning pear halves, too!


Sorry, I’m slow to reply. Yes, fine to can in 4 ounce jars and it’s safe to add dry spices.
Thank you
You’re welcome 🙂
Kris, thank you so much for this no added sugar recipe and canning information, just what I needed. Do I need to add apple juice in order to can this pear butter recipe? Thank you so much!
Cooking the pears down without any liquid can lead to scorching. Apple juice provides flavor, but you could use water as well.
I might add unrefined salt and lemon juice to the recipe to add dimension. I always like these two additions to sweet or fruity things.
Those two things are both safe to add to this recipe for canning purposes.