DIY grazing boxes make for happy grass fed chickens. They’re a great way to save on the cost of raising backyard chickens (and other poultry)! Here’s how to make your own.
Originally published in March 2015; this post has been updated.
In light of our continuous efforts to save money and still enjoy fresh grass fed eggs, we decided to implement grazing boxes as part of our backyard chicken adventure. Since we extended our chicken run with free pallets, we have extra room for these grazing boxes.
What are grazing boxes?
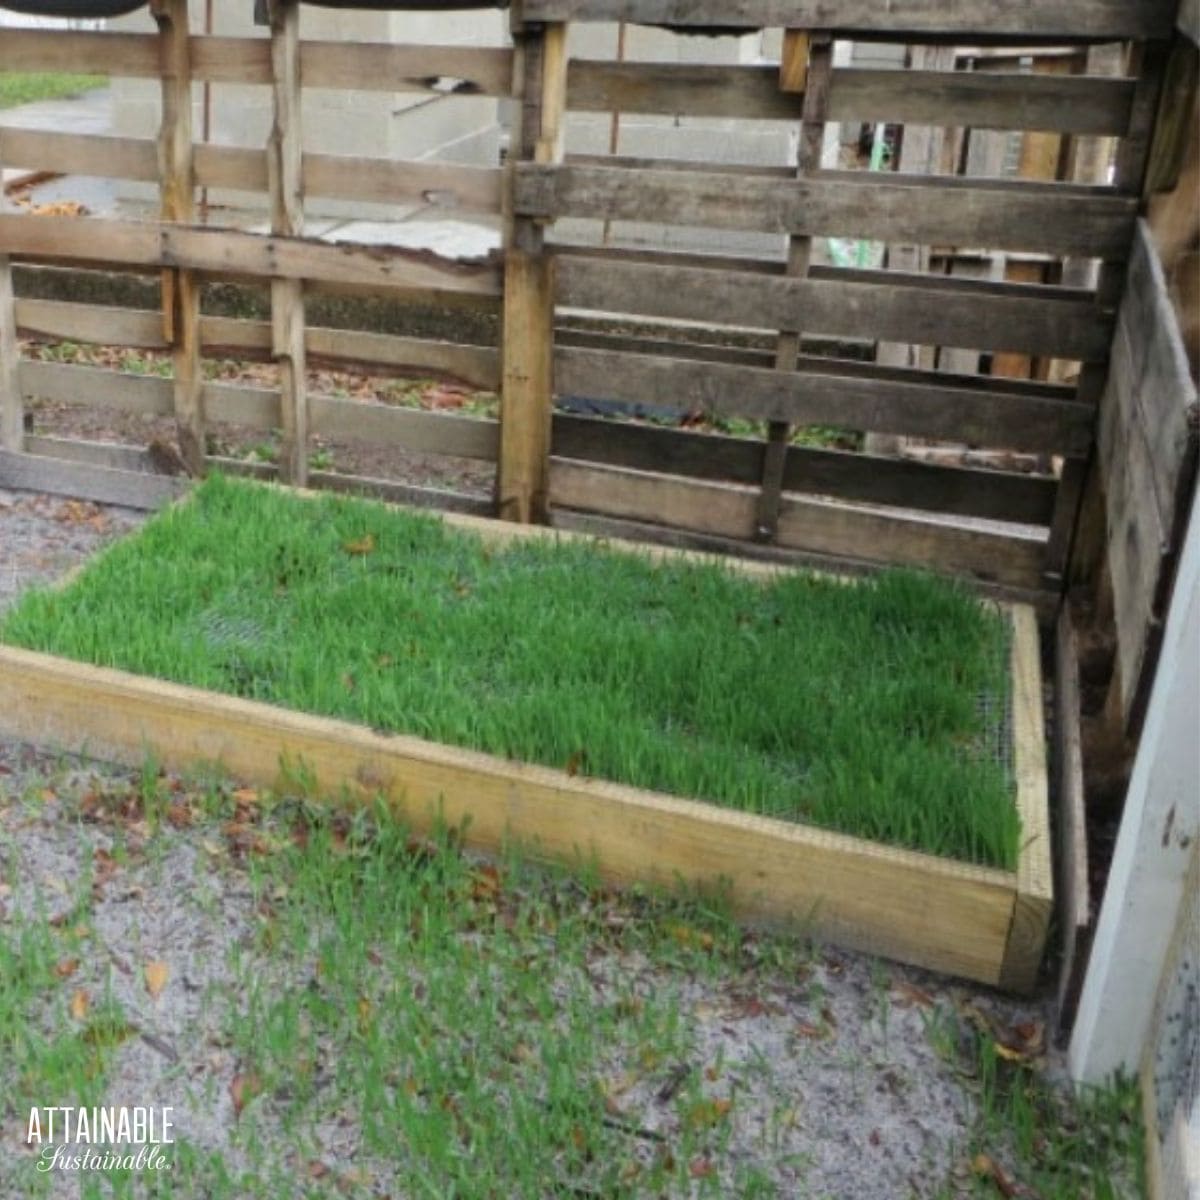
Just what they sound like: boxes that chickens graze on. The boxes are essentially planters protected with hardware cloth. The seeds—grains and greens—sprout, eventually growing taller than the hardware cloth which allows the chickens to peck at the fresh buffet. Voila — a salad bar that is protected from ferocious scratchy claws that tear up everything.
Happy chickens. Happy chicken people.
, too!")
Take a Peek Inside My Book!
Get a free excerpt from my book, Attainable Sustainable: The Lost Art of Self-Reliant Living! You’ll also get my free weekly newsletter, complete with recipes, gardening tips, and a little peek at what’s going on around here — both the zany and the mundane.
DIY grazing boxes for happy hens
Materials (makes one 3′ x 5′ box):
- 2 – 2′ x 6′ x 10′ (if you don’t want to use pressure treated wood, use southern yellow pine)
- 1/2 inch hardware cloth (3′ x 10′ roll)
- galvanized poultry staples
- screws; 2-1/2″ (we used Primeguard Exterior Screws by Grip Rite)
- hammer
- screw gun
- tape measure
- pencil
- speed square, optional (used to make sure your line is straight before cutting)
- circular saw (to cut your lumber)
- metal snips (for cutting the hardware cloth)
- dirt/compost to fill box
- grains/grass seeds
, too!")
Put together your grazing box
To make the box, cut both boards in half. This will leave you with two 5′ lengths and two 3′ lengths.
Take one 3′ length and one 5’length and screw the ends together to start your DIY grazing box. Butt the end of the 5′ piece against the 3′ piece. This ensures your hardware cloth will fit over the top of your box. Once you have attached the 3′ length to the 5′ length, it should look like an L. Now attach the second 5′ section to your first 3′ section and screw it together .
Attach the final 3′ section. While putting the box together, it’s always nice to have an extra set of hands to help push against the wood while another person is screwing.
, too!")
Planting the grazing boxes
Now that your box is complete, fill it with dirt/compost to within an inch of the top of the box. Liberally spread your grains/seeds on the soil and lightly rake them in. You can use regular grass seeds, oat, wheat, barley… pretty much any grain that you’d sprout for yourself.
Lay the hardware cloth on top of the box. Please note that on the ends of the hardware cloth there is a smooth side and rough side. Make sure the rough side is faced down so your chickens can’t scrape their feet on it.
Starting at one end, tap in staples with your hammer. Continue to roll the hardware cloth down the length of the box, stapling as you go. Keep the hardware cloth centered and tight so it fits evenly. Once you have secured your staples on the hardware cloth, cut the end of the hardware cloth using metal snips. Try to cut the end so it stays flush with the end of the wood instead of draping over.
If there is any overlap of hardware cloth down the sides, use your hammer to tap the hardware cloth into the wood so it’s not sticking out. Give your seeds a good watering twice a day and within a week you’ll start to see growth!
, too!")
Hints & Tips for Keeping Chickens in Your Backyard
- How to Grow Fodder for Chickens
- Make a Chicken Swing
- Feeding Chickens on a Budget
- Butchering Chickens
- Mistakes I Made in the Chicken Coop
- Put Your Backyard Chickens to Work in the Garden
- Grazing Boxes for Chickens
- Plant a Chicken Garden
- Do Your Hens Need Supplemental Light?
- Chicken Coop Supplies
- Controlling Mites
- Keeping Chickens Cool in Extreme Heat
- Build a Chicken Coop Extension from Pallets
And think about planting a chicken garden for your girls, too!
, too!")


This is such a fantastic idea! I love how easy these grazing boxes are to build, and I’m excited to try this method to reduce my chicken feed costs while providing my hens with some natural foraging options. Thanks for sharing this practical solution!
This is such a fantastic idea! I love how easy and affordable these grazing boxes are. It not only helps cut down on feed costs but also gives chickens a more natural diet. Can’t wait to try this out in my backyard! Thanks for sharing!
Are you saying the boards are:
1 each of 2x2x6 and 2x2x10.
Two of 2′ x 6′ x 10′
I’ve done this same thing! It works great, but eventually the amount of chicken poop that accumulates in it causes the grass to die. Any suggestions??
Darn! Maybe have two and give them access to one at a time if possible.
You need to relocate your box or change soil. You can sell it us chicken manure compost or start gardening.
Thank you so much for this.
It’s been on my to -do list for ages and seeing your post has given me the oomph to actually do it.
As well as for the hens, I’m thinking thiis idea would be great for the second stage of bokashi composting. My dog dug up all my second stage boakshi when I tried it but if i put it in the dog-proof chicekn run, with a salad bar box on top, the lovely worms will do their job and i’ll hopefully get awesome compost.
Yes, great idea I hope that works well for you! Cheers to awesome compost 🙂
How do you keep them from standing on it and popping. I built one and had stuff growing great, until all the poop killed it out
I feel like they’d have to poop a LOT to cause damage to the greens?!
Hello, I’m thinking about doing this in our chicken run. I know this is several years old, but is there a risk for Bumblefoot when using hardware cloth? I’ve been told that letting chickens walk on wire fencing may cause Bumblefoot bit I’ve also read that it’s caused by an infection in cuts on their feet. I have some 1/4” HC left over from building the chicken run. Think that would work?
It might be a problem if they were on this surface all day long, but I don’t think on/off to nibble would cause a problem?
We recently built one of these for our girls and it’s a game changer! We have a good size run that they stay in most the time. The grazing box allows them continued access to fresh greens and keeps them very entertained (like they can wait for sprouts to come up past the fencing!). I love that it adds that splash of green to the barren run too. I would highly recommend building a grazing box to anyone who keeps chickens!
What is the best type of seed to get. Type of grass.
You can use regular grass seeds, oat, wheat, barley… pretty much any grain that you’d sprout for yourself.
I made these. Thank you for the how too. I used a mix of grains and seeds I found on Amazon for chickens. They loved it. Unfortunately I used chicken wire abs it isn’t strong enough so they bent it down to the ground. The. Drought. So I’m going to start over and use hard wire and maybe even put a drip irrigation on it.
Do you have any tips for creating an upright barrier to grow plants along a fence line?
I can’t wait to use this idea for my rabbits! They’re going to love it!!
Great idea
Good idea. I will build it and see how it works for us.
what kind of seeds do you use?
I’ve also looked for seed to do this project with and all the seed that is available to me is chemically treated so that it is weed free. I am wondering where you get your seed?
If you can’t find grass seed that you’re happy with, you could try sprouting oats in it.
i have a raised bed grazing box with grass but it seems the hens poop will burn it and it does not grow well . i have tried with seed and then growing it first, then allowing the hens access with the hardware cloth top with no luck. what do you suggest?
What kind of seeds have you used successfully?
What is a good seed(s) to plant for the Texas Hill Country?
Check with your local cooperative extension office or nursery.
I love your idea, but the carpenter in me is screaming about the wasted 4 foot of 2×6; Simply buy another 2×6 that is 12 foot long and cut it into four 3 footers; you then have your four 5 footers and four 3 footers; your hardware cloth is 10 foot long: Voila!! TWO grazing boxes!!
love this idea! I like the better use of lumber thanks.
What kind of grain seeds did you use?
I’ll see if Loriel will chime in here, but you can use regular grass seeds, oat, wheat, barley… pretty much any grain that you’d sprout for yourself.
Love the information it is greatly appreciated. Took me a few to figure out you need 1 2x6x6 and one 2x6x10 to get 2 2x6x3s and 2 2x6x5s. Thought that you might want to change. You have listed 2 2x6x10s listed. But still great. Love it when people figure things out, like hardware width to box size. NO WASTE of time or materials LOVE IT. Thanks again! Amy
Thanks for sharing this excellent idea!
I do similar but have a hinged lid on mine. Probably easier to just make a box like yours that I can pick up when it’s grown. Great idea.
Even cheaper- use pallets for this! Pull off most of the cross piece timbers, but keeping the frame in place, staple your hardware cloth over the top, and finished! Not as pretty, but still functional and easy to move around.
I looked on homedepot.com and they only have southern yellow pine plywood…no 2x6s. where do you get the southern yellow pine?
That’s what Loriel used, but you can certainly use standard pine or Douglas fir.
Where you buy a plain wood non treated 2×6 it’s most likely yellow pine. Just go to your local lumber dealer and ask for 2×6 non treated board, they will help you out.
It does not say what is planted….
This is a great idea and very useful for those of us who are just getting into having chickens. I’m presently building our coop/run in prep for chickens in a few months. The future run is in a very grassy part of our yard. I’m going to make the frame with hardware cloth and simply set it over a grassy part of the run in order to allow the grass that’s already growing there to make its way up through the screen. Thus saving time and labor on adding potting soil and seeds.
Just make sure that some areas are available with dirt for dust baths.
Yes!
Just getting ready to have chickens for the first time. 3 to start. How much would a box this size supplement their diet? Quite a bit or just like a snack?
This would strictly be a snack since it would not contain close to the full nutrients needed to support egg production. You can also soak any laying mash you buy for 2-3 days (fill pail half full with grain, cover to the top with water) which will ferment, increase vitamins and health benefits of the feed, and the chickens don’t eat nearly as much as they do when it is dry. Throw in a squash or melon cut in half or lettuce for extra treats. 🙂
What seeds do you plant in these boxes? Wonder if there is a grass, wheat, barely, buckwheat, or other that would continue to grow when the top is eaten off–like when you mow the grass, so that you wouldn’t necessarily have t replant all the time. I am growing buckwheat in indoors this Winter in trays and it works great. First year with chickens. They grow in empty trays with no soil at all. When the sprouts get about six inches tall the roots are root bound and all you have to do is pull a chunk of it apart like a piece of carpet and toss into the chickens. Wish I could insert a photo. Don’t know if seeds like this would continue to grow if nipped off through the mesh.
Here’s a idea to make it easy to remove the hardware cloth for replanting.
Build the frame normally, but get some 1″ x 2″ wood strips, and build a rectangle the same size as your growing box from them. Then attach the hardware cloth to this light weight frame.
You could attach it to the grow box on one side with a hinge, then flip it open when it’s time to replant. You might want to add a hook on the opposite side to keep it down, or weigh it down with a couple rocks.
That’s what I do. https://www.fresheggsdaily.com/2012/05/diy-chicken-salad-bar-giveaway-from-my.html
This is such a great idea. I was wondering what your plan is when you want to replant? Did you secure the hardware cloth in a way that will make it easy to remove for replanting?
Hey Trista, great question. My husband and I were just talking about this the other day and I think what we’ll do is lift the entire box, rescatter, and then place the box back on top. It’ll probably take some finagling but I think it’ll work. I’ll report back and let you know.
I was thinking that you could attach the hardware cloth to a frame made with 2X2’s, which is the same size of the box, then place on it on top and secure with a couple screws. This way you can remove the screws, lift the frame and replant, then secure the frame back in place.
Good idea!
I make these for my chickens with a hinged lid so they’re easy to replant. https://www.fresheggsdaily.com/2012/05/diy-chicken-salad-bar-giveaway-from-my.html
Attach it with hinges on one side and a latch on the other. Unlatch, lift, reseed & close. 🙂
Why couldn’t you just let the seeds fall between the grid of the hardware cloth??
Sure. You might want to sprinkle a bit of soil over the top of them, though.
I was wondering the same thing 🙂
I made one of these for my girls by using a hard case suitcase which had a broken wheel. I took all the wheels off. Cut through the join so I had two halves drilled a few holes through the suitcase. 3/4 filled it with soil. Literally covered the entire surface with seeds. Raked it a bit and watered. It. Once the seeds had sprouted and grown to about 4 inches I covered it with an old wire basket from an ikea cupboard that I had lying around. It was a perfect fit. The chickens love pecking through the gaps and eating the wheat grass.
Clever!
We do exactly that. We use a couple of plastic parmesan jars because they have big holes. One with seed, one with top soil.
Why not just toss seed on top of wire mesh and then sprinkle dirt on top of seeds. No need to remove wire.
Andrea, you and I agree! Keep it Simple! these folks are over thinking and complicating stuff!
Wonderful, fantastic idea! I have to that chickens, especially ones that live in runs, would love this! A healthy and mentally stimulating activity that is also very useful, as basic regular garden beds can be also constructed this way, especially if you have a dog or cat that digs, or deer that eat plants down to the crowns. Fabulous!
Good idea!
I am so adding this to my hubby’s to do list…he thanks you…I am sure!!! LOL
Haha! My husband feels the same way. “No honey, the honey-do list will never end.” 🙂
Don’t wait for your hubby–make it yourself! I made one of these yesterday and it was super easy! You can have the hardware store (or lumber store where you get the wood) cut these to length for you, or (like me) you can cut them yourself. It only took about an hour (including nailing on the wire cloth) total. I’m super excited to have the grass start growing and watching my ladies graze.
Can I start one of these now in the fall in southern states? And which seeds are appropriate for fall? Thanks
You’re welcome! 🙂
Thank you for the great info!
Could use pallets for this too!
You definitely could, and that’s a smart idea!
Pallet wood is often treated with toxic stuff, and also tends to disintegrate quickly, leaving even more toxins in the soil. I do not recommend pallet wood.
This is handy info for people who wish to find *safe pallets. https://www.universalpallets.com/2018/01/ultimate-guide-pallet-markings/
It’s ok to use heat treated and kiln treated pallets. There are markings on pallets that tell you how they’re treated. A quick google search or search on Pinterest will guide you in selecting safe pallets.
We used pallets for ours. 🙂 They work great!
I have been wanting to plant these boxes for my chickens. Thanks for posting a great how to!
Great timing then! It’s really so easy that I’m not sure why my husband and I waited so long to do it.
What types of seeds do you like to use for your boxes? This is such a great idea!
What did you plant? I know great is an option, anything else though?
Oat grass is another great option. Get whole oats at the feed store.
What’s funny is, as I was leaving the pen a few minutes ago, I said to the girls “I’m going to plant some seeds for you to have your very own buffet in a few weeks”. I opened facebook and here is your article. Thank you for that.
Serendipity!
Awesome! They are going to love it.
Do you have to re seed bed. How much seed do you use.
I plan on doing this during warm months but keep a tray or 2 going inside. My girls will love it. They wont have to wait for me to bring it to them. Thanks
Yes, you’d need to reseed the bed after a time, scattering the seed close together. (1/2″-1″ apart, maybe?)
I’m sure your girls love their boxes. I wonder if the seeds will have a chance to sprout before they get eaten! Haha
That’s exactly why the wire is there – to protect the seeds from scratching feet.
Haha! Right? We kept them away from the box for about a week and a half and now they go out every day on it. They’ve basically “mowed” it down to hardware cloth level but it keeps them busy as they try and get their beaks in the small square for a snack.